3dsmax - Maxwell Materials
- Systems Next Limit (Unlicensed)
- Anonymous
After installing Maxwell for 3dsmax you will notice three new Maxwell Material types in Material/Map Browser:
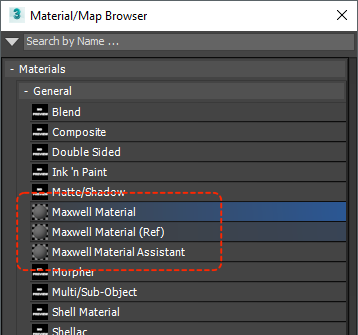
Maxwell Materials
The three types are based on the first one, as Maxwell only has one shader with which you can create any kind of material.
- Maxwell Material is the main material. Everything is based on this, so once you master it, you will know almost everything about materials in Maxwell. It is also called Maxwell Layered Material as it includes a material tree where you can stack several layers on on top of the other. You can learn more about it in this page: 3dsmax - Maxwell Layered Material
- Maxwell Material (Ref) is a node allows loading a referenced Maxwell material file (.mxm); this way the materials are stored outside 3dsmax scene files and makes easy creating a local material library with the materials you use often. Additionally, if 3dsmax crashes for some reason, all the work done in the materials won't be lost. Please, refer to this page to learn more about them: 3dsmax - Maxwell Referenced Material
- Maxwell Material Assistant exists to simplify the process of creating new materials in Maxwell; it uses a Maxwell Material under the hood and you can always swap to its interface (by clicking Change to Layered Material button); it offers a simplified interface for different types of materials, like Opaque, Metallic, Transparent, Translucent, etc. You will find more information about them in this page: 3dsmax - Maxwell Material Assistant
Material Preview Options
In both Maxwell Material and Maxwell Material Assistant you will find this collapsible section; it allows to control all the parameters related to the preview specifically for each material.
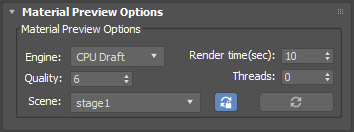
These options are very similar to what you can find in Maxwell Preferences panel (3dsmax - Plugin Preferences), but can be easily changed when editing the material in order to change the preview scene, the quality, etc.
- Engine options lets you choose whether to use the CPU Draft or CPU Production engine when rendering material previews.
- Quality option lets you choose the sampling level limit for the preview
- Scene dropdown menu lets you choose among several different scenes to preview your material
- Render time (sec) sets the time limit for the preview render in seconds.
- Threads sets the number of CPU threads that the preview can use. When set to 0 the system will automatically detect all the threads available.
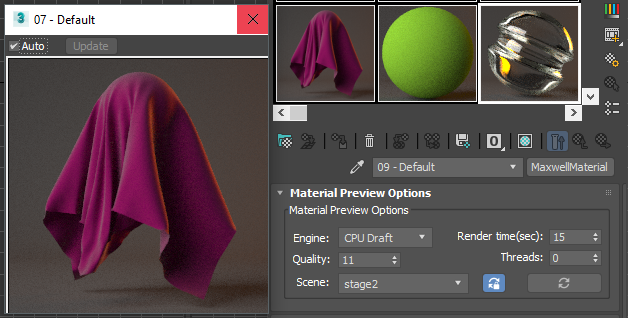
- OnDemand / Automatic preview toggle:
 this button controls how the material preview is rendered; On Demand mode renders the swatch only when the Update Preview button is pressed. Automatic mode refreshes the swatch whenever a material attribute is changed.
 - Refresh Preview button:
 generates a single new preview of the material.
You can as well open a bigger preview screen by double clicking on a swatch; the small one will render first and then the bigger one.
Textures - Maxwell Bitmap
Maxwell uses the Maxwell Bitmap to represent textures. The parameters are the same as the ones presented in the image and projection properties from the Maxwell's Texture Picker from the main Maxwell documentation. This section of the documentation will outline only the parts of the UI that are specific to the Maxwell Bitmap node.
Projection Properties
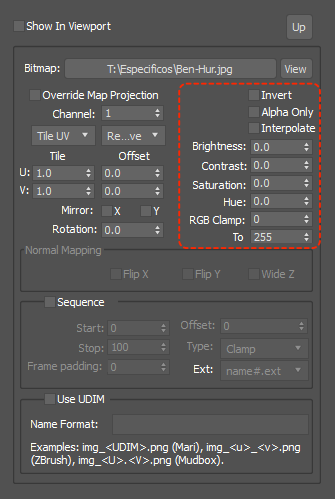
Image Properties
The Show In Viewport checkbox provides a viewport preview for the current texture on the meshes that have this material assigned.
The Up button goes up one level, hides the Maxwell Bitmap UI and brings the user to the previously selected element inside the material tree.
The Sequence checkbox instructs the plugin to treat the image as a sequence.
The Start edit is used to determine the starting frame of the image sequence.
The Stop edit is used to determine the ending frame of the image sequence.
The Frame Padding edit is used by the plugin to determine the number of 0 used to pad the frame number in order to obtain the sequence file name.
The Offset edit adds the offset to the current frame.
The Type combo determines the sequence behavior when the current frame is outside the [Start, Stop] interval.Currently the following modes are supported:
- None - When the current frame is outside [Start, Stop] the texture is not displayed.
- Repeat - When the current frame is outside [Start, Stop] the frame number is looped.
- Clamp - When the current frame is outside [Start, Stop] the frame number is clamped to the nearest end.
Note: The Show In Viewport and Up buttons are dependent on the material that contains the MxBitmap and as such they only appear when viewed through the material tree.
Maxwell Bitmap does not yet support procedural textures. If you wish to render such nodes, you will have to use a referenced MXM material.
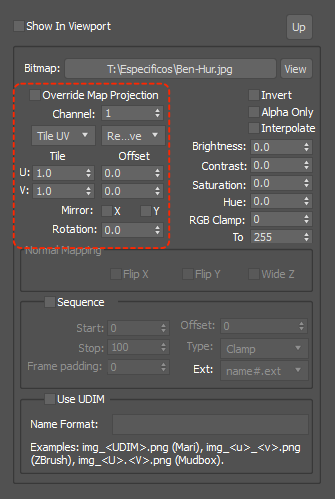
Override Map Projection
This option is very useful if you have several textures in the same material that share the same projection properties. It creates an additional set of projection values that can be shared among the textures of the same material. Whenever you activate Override Map Projection option, this set of values become active and can be edited. All the changes done to the projection settings will be shared between all the textures in that material that have Override Map option active. This way you can modify projection properties for several textures at the same time. Here you can see it in action:
Override Map workflow