Preview
- thomas (Unlicensed)
- Alex Ribao
Jump to
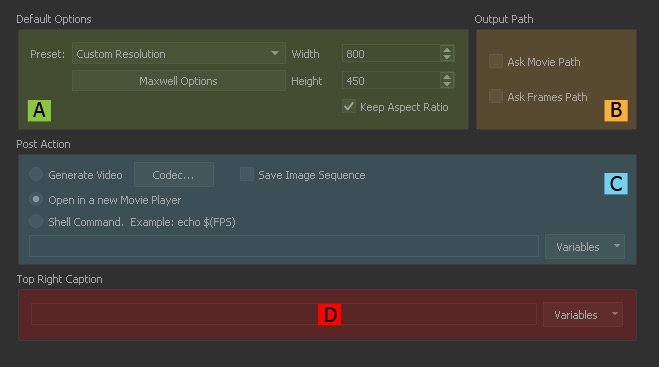
Default Options (A)
Preset
You can choose from a wide variety of predefined resolutions for the preview. With “Custom Resolution” it is possible to define the “Width” and “Height” of the preview window.
Width | Height
These parameters represent width and height of the preview images measured in pixel. The default value is 640 x 480.
Keep Aspect Ratio
Lock the ratio between “Width” and “Height”.
Maxwell Options
This button opens a new window where you can adjust the global settings for RealFlow's implementation of Maxwell Render. A complete parameter description is located under → “Preview: Maxwell Options”.
Output Path (B)
Ask Movie Path
If you do not want to store a complete preview movie in the project's default folder enable this option. Then you will be asked where to store the file.
Ask Frames Path
If you do not want to store a complete preview image sequence in the project's default folder enable this option. Then you will be asked where to store the files.
Post Action (C)
Generate Video
With this option, RealFlow will automatically create a video file with the compression method specified under “Codec...”.
Codec...
This button lets you choose your favourite video compression method to save disk space and allows smooth playback. Available codecs depend on your operating system and its installed components.
Open in a new Movie Player
When enabled RealFlow directly loads the preview to the “Movie player” window.
Shell Command
This feature can be used to send commands to a terminal application to specify certain aspects of the final video. The associated “Variables” button offers a drop down menu with available commands.
Save Image Sequence
When the preview is converted into a video (“Generate Video”) the individual images are discarded by default. If you want to keep the image sequence enable this option.
Top Right Caption (D)
A caption is an additional information that is printed to the → viewport. The associated “Variables” button offers a drop down menu with available commands. To show the label it has to be activated under Menu Bar > View > Show Preview Caption.
An example:
$(SCENENAME) - Preview @ $(FPS) fps / Current frame = $(FRAME)
The first variable $(SCENENAME) prints the project's name to the viewport, followed by the adjusted frame rate, $(FPS). Finally the current frame, $(FRAME) is attached. A complete output could look like this:
Hybrido_City_Flood_Ver_14_150714 – Preview @ 25 fps / Current frame = 428