Animation
- thomas (Unlicensed)
The easiest way to animate a node is to use the circles next to its parameter names. These circles also indicate which parameters can be animated and they have several states. Some parameters, for example “Position” or “Rotation” have three values for their X, Y, and Z directions. If you want to animate these values individually click on the “+” symbol. Each circle/dot also has a right-click menu and the entries depend on the state.
| Grey circle | No animation. |
|---|---|---|
| Red dot | Animation key (also indicated by a red line in the timeline). |
| Red circle | Parameter is animated, but there is no key at the current point in time. |
| Green dot with lines | Parameter has an expression. |
| Lock symbol | Parameter is locked and cannot be changed. |


The following paragraphs introduce several (freely combinable) methods for creating keys.
Adding Keys using the Parameter Circles
- Select a node and open a parameter in its “Node Params” panel.
- Drag the timeline slider to the first animation frame.
- Click on the circle – it will become a red dot (= key).
- Drag the timeline slider to the next/last frame. The dot turns into a circle again (= no key).
- Change the parameter's value or shift/rotate/scale the node.
- Click on the red circle again to set the next key.
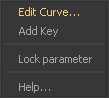
Adding Keys with the Right-Click Menu
- Select a node and open a parameter in its “Node Params” panel.
- Drag the timeline slider to the first animation frame.
- Right-click on the white circle and choose “Add Key” – it will become a red dot (= key).
- Drag the timeline slider to the next/last frame. The dot turns into a circle again (= no key).
- Change the parameter's value or shift/rotate/scale the node.
- Right-click on the red circle again to set the next key.
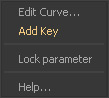
Adding Keys in the Curve Editor
- Select a node and open a parameter from its → “Node Params” panel.
- Right-click on the parameter and choose “Edit Curve...”. The → “Curve Editor” appears.
- Double-click on a free area of the canvas to create a key.
- Set the exact frame and parameter value with the two input fields (see image).
- Repeat this process until all frames are set.
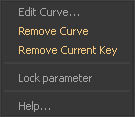
Here is how to remove a key:
- Click on a red dot – it will become a circle.
- Choose “Remove Current Key” from the dot's right-click menu.
- Select a key in the “Curve Editor” and hit the Del key.
- In order to delete the entire animation curve, choose “Remove Curve”.
Expressions
Instead of setting key it is also possible to animate a value with a formula or a condition:
- Enter the expression to the appropriate parameter field,e.g.
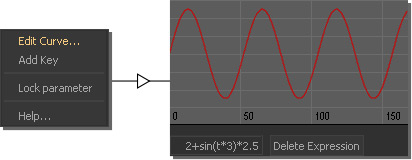
=2+sin(t*3)*2.5(mind the = operator!) - Alternatively, right-click on the circle and choose “Edit Curve...”
- Then, go to the empty line at the bottom of the appearing “Curve Editor” and enter the → expression, e.g.
2+sin(t*3)*2.5
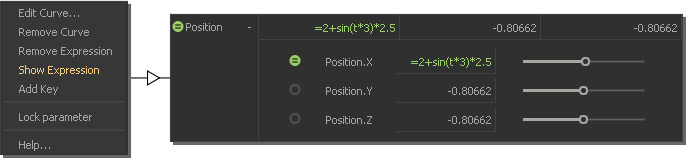
- You will see that the circle turned green and has two black lines.
- Click on the parameter's "+" symbol to open the slider section. There you will find green dots for every expression-driven parameter.
- Right-click on the green dot and choose “Show Expression”. Now it is possible to edit the expression in the parameter's field without having to use the → “Curve Editor”.
- Switch back to the current value with “Show Value” from the right-click menu.
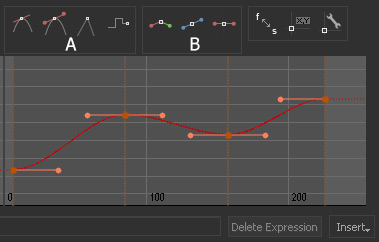
Working with Animation Curves
When you right-click on a circle/dot choose “Edit Curve...” to open the → “Curve Editor”. There you can
- create, delete, position, and refine keys
- (multi-)select keys and copy/past them to other curves
- extend curves
- change the key type to linear, TCB, Bezier, stepped or combinations of all modes (A)
- break, unify, and flatten tangents (B)
- change the curvature, create ease-in and ease-out effects
- add → expressions.