Node Params
The "Node Params" window is dynamically adjusted to your node selection and provides all available parameters and settings. Parameters are subdivided into three main tabs. It is possible to select one, two or all three tabs to customize the number of displayed parameters.
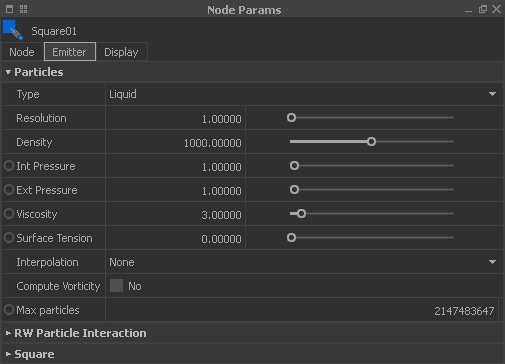
An example of a "Node Params" panel
- Each tab contains a subpanel with a set of parameters, e.g. “Node”, “Particles”, Rigid Body”, “RealWave”, and so on.
- Some parameter fields are expandable with a click on “+”. Here you will find parameter sliders, notes, → gradients and → colour settings.
- Spatial parameters, like position or rotation, always consist of three values for the X, Y, and Z coordinates. RealFlow's → axis setup defines which coordinate will serve as the scene's height axis.
- A grey circle indicates that a parameter can be → animated.
- A right-click on a parameter set's headline (e.g. “RW Particle Interaction”) opens a help text.
- The F1 key opens a parameter's individual help text.
- Mathematical operations can be performed directly within the input fields, e.g.
=original value*sqrt(2)or=original value+10
Right-Click Menu
When you right-click on a parameter name a small context menu appears:
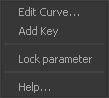
Edit curve (animatable parameters only)
When chosen RealFlow creates an empty animation curve for each parameter value, and opens the → “Curve Editor”. There it is possible to add and edit → animation keys.
Add key (animatable parameters only)
A click on this menu entry adds an → animation key for each parameter value at the current time.
Lock parameter
This option prevents a parameter from unwanted changes. Locked parameters carry an appropriate icon.
Help
Here you can get individual help for a parameter. Alternatively, press the F1 key.