Maxwell Scenes
- thomas (Unlicensed)
This handy tool is a powerful import filter for MXS (Maxwell Scene) files: it analyses and splits the scene into its components, and lists them in a tree structure. When a MXS file is loaded, RealFlow creates references, and does not import the nodes. To finally import them, click on the green arrows.
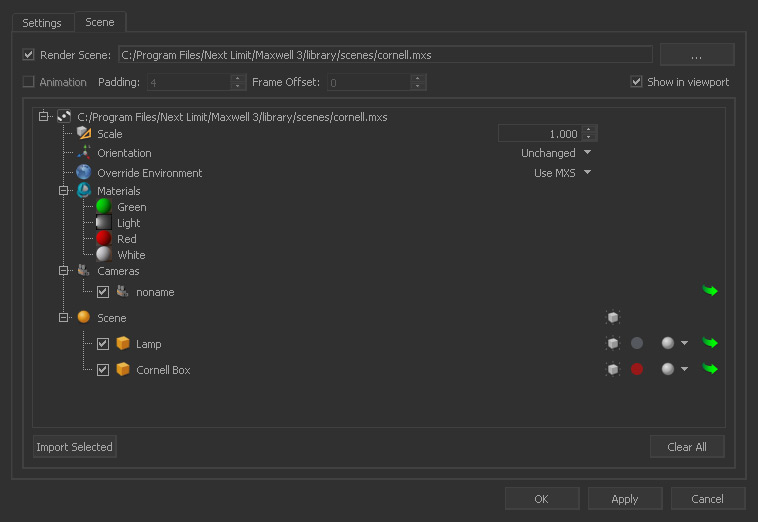
The "Render Scene Manager" with an opened example scene.
The manager's mode of operation is straight forward:
- Load a MXS file with the “...” button next to “Render Scene”.
- Under “Scene” you will see a tree with the groups and nodes.
- When "Override environment" is active RealFlow will use the parameters from the "Settings" tab instead of the embedded settings from the MXS file.
- Cameras are treated separately and must be imported with the green arrow in order to make them usable.
- The “Materials” branch of the nodes tree lists all available shaders; available materials will be applied automatically after import.
“Clear All” will remove all embedded nodes.
If the viewport appears to be empty switch to camera mode with the 5 key. If the scene contains more than one camera then
- drag a camera from the “Nodes” panel to the viewport
- or press the 5 key until the desired camera is active.
The symbol bar provides the commands listed below – changes can be made to a group's elements or individual nodes. These, and other options, are also accessible via a right-click menu:
![]()
A) Visibility
Decide, whether the node should be visible in RealFlow's viewport or not.
B) Colour
This is just a node's viewport colour. Existing materials will be imported as well and linked accordingly. The applied materials can be found under Node Params > Maxwell Render.
C) Shading mode
Choose from four different shading modes.
D) Import
A click on the green arrow imports a node. Then it will be able to interact with other scene elements, it can be turned into a rigid or soft body, or float on a RealWave surface.
Animated Nodes
The “Render Scene Manager” is also capable of handling animations. The MXS format cannot store animation data within the file, but you will find one file per frame. When an animated node is imported (D, image above) it will lose its animation features, because the connection to the referenced files will be broken.

- Enable the “Animation” checkbox and open an arbitrary MXS file from the sequence.
- To see the animation, scrub the timeline.
- If the animation is not visible check “Padding”. By default, a five-digit padding is used, e.g. “Walking_Man_00001”.
- A “Frame offset” can also be applied.