Node Types
- thomas (Unlicensed)
Jump to
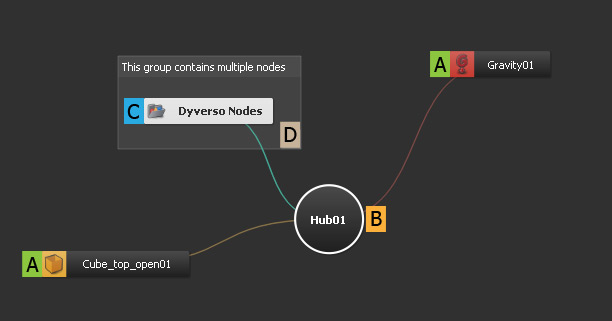
Scene Element Nodes (A)
Every scene element is represented in RealFlow's “Relationship Editor” as an icon. The nodes in the “Relationship Editor”, the viewport, and the “Nodes” panel are synchronized. When a scene element is, for example, removed from the viewport it will also disappear from “Nodes” panel and the “Relationship Editor”.
There is also a very simple rule that is valid for all nodes in your project: if it is possible to link two nodes directly then they will be able to interact with each other.
Hubs (B)
When the first scene element is added RealFlow creates a “Hub”. All following nodes will be connected to this hub as well. A hub is a global connector: scene elements which are connected via a hub will be able to interact. If you do not want to create a default hub please disable
Tab menu > Add to Default Hub
New hubs can be created on demand to create groups of interaction: Tab menu > Add new Hub. A connection between a node and a hub is established in exactly the same way as node-node link:
- Place the mouse pointer over a node.
- Press the Cmd/Ctrl key while dragging a new line between the node and the hub.
Groups (C)
Groups will help to keep the “Relationship Editor” clear:
- Select the nodes you want to group.
- Right-click on one of the selected editor nodes and choose “Group”.
- The group can be expanded and collapsed with a double-click.
Notes (D)
Notes can are added from
Tab menu > Add New Note
Here are few basic things your should know about notes:
- To resize a note drag its lower right corner.
- When you click on the note's upper area it becomes editable.
- The note icon can be dragged to any place, but it will always remain in the background.
- If you want to change the note's text or icon colour right-click on its upper area, and choose the appropriate option from the menu.