WetDry Map Creation
- thomas (Unlicensed)
When particles interact with an object they can leave marks on its surface creating an effect as if the object was wet. RealFlow provides an easy-to-use method with several options for adjusting the strength of this effect and the maps' drying speed. Before you can start to wet your object you have to make sure that it has proper UVW coordinates applied. This is something that has to be done inside your 3D application, because RealFlow does not offer any ready-to-use tools to manipulate texture coordinates.
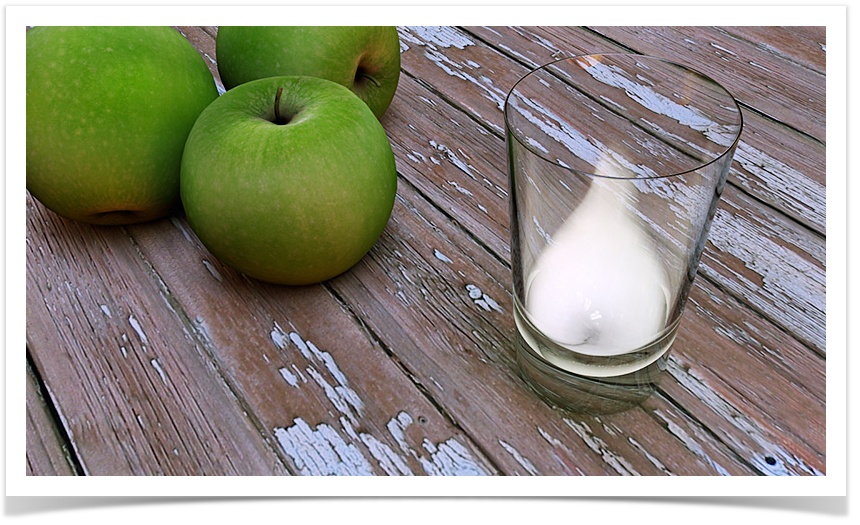
Result of the tutorial (the fluid is not visible here).
So, please always check that your objects have proper UVW coordinates, otherwise the entire process will fail. If you can see a grey surface during simulation or mirrored patterns then you have to rebuild the object's UVW grid. Once your object has correct UVWs, wetmap creation is a matter of just a few clicks. There are a few important things to consider. But, let's start with a typical scene: a glass that is filled with milk.
Nodes List
The glass node must be created in your 3D application and → imported to RealFlow. The other elements can be added from RealFlow's "Standard - Particle" or "Dyverso - Particles" shelves. You also need the "Daemons" and "Objects" shelves:
- 1 double-walled glass (milk glass)
- 1 “Cube” object (ground)
- 1 “Circle” emitter (standard particles or Dyverso particles)
- 1 “Gravity” daemon
- 1 “k Volume” daemon
The Setup
Import the glass model with Ctrl/Cmd + I.
If you want to replace/rescale the object, unlock it with the “SD ↔ Curve” button first under Node Params > Node.
The “Circle” emitter is placed above the glass and slightly rotated. It's arrowhead should point in the direction of the glass, because this will be the particles' motion direction. If the emitter is too big or too small, rescale it with the R key.
Increase the emitter's “Resolution” value (under “Particles”) to get enough particles.
Add the “Gravity” daemon.
A “Cube” node acting as a ground plane is placed beneath the glass.
Insert a “k Volume” daemon and enclose the objects inside its bounding box, but please make sure that there is enough room upwards.
Activating the WetDry Maps
Since wetmaps are a property of an object you will find the appropriate feature in the glass node's settings:
- Node Params > Texture > WetDry texture > Yes
This action unlocks the parameters below and the object in the viewport should turn black. If this does not happen, please activate this feature under the object.
- Display > Texture > WetDry
Here's a short description of the wetmap feature's parameters:
“Resolution” is the map's size in pixel. Please bear in mind that RealFlow maps are always squared and sometimes you have to stretch the output files to make them fit.
It is possible to blur the particle marks with a Gaussian filter, and “Filter loops” determines how often this filter is applied.
“Filter strength” defines how much the marks are blurred. The maximum is 1.0.
With “Pixel strength” you can specify the spots' brightness. 255 creates purely white marks, with 128 the brightest spot will have a middle-grey tone.
“Ageing” is used to make the wet parts vanish over time. A value of 0 means that there is no ageing effect all (but you will see a drying effect anyway). Higher settings will make the spots dry faster. The used value strongly depends on the material you want to simulate.
Below the settings for the first simulation. As you can see, “Ageing” is relatively high, but that is absolutely Ok, because milk residues on glass surfaces vanish rather fast:

Finally, you have to activate the glass's wet-dry map export resource:
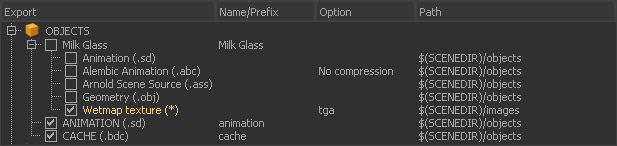
- Press F12 to open the “Export Central” dialogue.
- Look for the glass node under the “Object” branch and open it.
- Check the “Wetmap (*.tga)” box and confirm with “OK”.
- The maps will be written to the project's “images” folder.
Final Settings
In order to get more splashes and a vivid fluid simulation, you should make a few more adjustments to the “Circle01” emitter. These settings can be found under the “Circle” panel:
V random/H random = 1.0/1.0
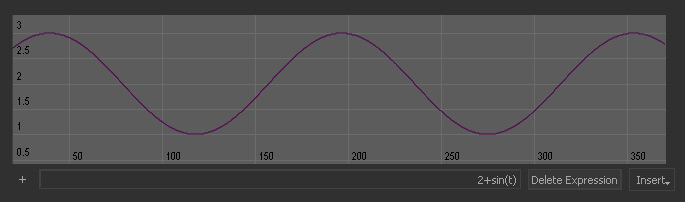
Speed > right-click > Open curve
The → “Curve Editor” is opened.
In the empty field at the editor's bottom, enter: 2+
sin(t)This, so-called → expression creates the typical pouring effect when a fluid is leaving a bottle or a carton.
The Simulation
The particle marks are visible in the viewport directly at simulation time, and even when you create an → OpenGL or → Maxwell preview. To make them clearly visible, make the emitter invisible. Bear in mind that in RealFlow the maps often look a little bit dull or greyish. This is simply the result of scene's shading.
Play with different emitter “Resolution” values, and wetmap settings, e.g. “Ageing”.
If you think the particle marks are not blurry enough simply load them to an image-processing program, add a Gaussian filter, and enhance the effect.