Rhino 5 - Camera
- Former user (Deleted)
- Next Limit
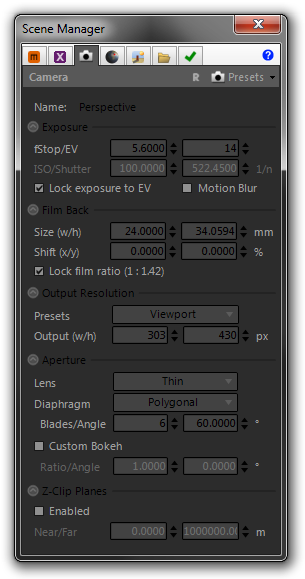
The Camera page contains parameters which are used to control those parts of the Maxwell camera which are not inferred from the Rhino view to which it is associated (i.e. position, target, etc.). These parameters relate to the exposure, image output resolution, and some other special camera-related Maxwell features. Each view gets its own Maxwell camera.
Exposure
The parameters in this group determine the camera’s exposure.
| Parameter | Description |
|---|---|
EV | EV, or Exposure Value is a number used to express the basic exposure which will be seen in the exported MXS. EV may be used to set the exposure directly, where brighter scenes will require a higher EV, or it may be used as an exposure readout when setting fStop, Shutter, and ISO manually. For example, an outdoor photo during the daytime may require an EV somewhere around 12-16, while a dark candle-lit scene may require a value much lower, maybe around 4-6. Charts containing recommended EV for various lighting conditions can be found online (see the end of this manual for a chart from wikipedia.org). EV is not actually a parameter found on Maxwell cameras – it is a theoretical value which is continuously figured by the plugin itself. The ‘Lock exposure to EV’ option is provided for one basic reason: while exposure may be adjusted manually using different combinations of fStop, Shutter, and ISO, it is possible to adjust the DOF (depth of field) on the camera using the fStop without also affecting the overall exposure of the shot when the plugin is allowed to maintain a given EV. This allows you to adjust the camera’s exposure and DOF on a totally independent basis, and this makes setting up exposure much easier and more predictable. |
| fStop | A camera’s fStop refers to the size of its aperture. Lower numbers denote a larger aperture, which exposes the camera’s sensor to more light. Additionally, a larger aperture reduces the camera’s DOF (i.e. ‘depth of field’), or the distance between the nearest and furthest points which will appear in focus. Smaller apertures (higher fStop numbers) result in a greater DOF, but expose the camera’s sensor to less light. Therefore, as the fStop is increased, the exposure must be compensated. This can be done manually, by adjusting the camera’s shutter or ISO values, or it can be handled automatically by the plugin by enabling the ‘Lock exposure to EV’ option. When the exposure is locked to the EV, changes to fStop will not affect the overall exposure of the output image, since the plugin will adjust the camera’s shutter as necessary to maintain a consistent exposure. |
| ISO | As with a physical camera, the ISO parameter affects the camera sensor’s light-sensitivity. It is not necessary to adjust ISO directly when ‘Lock exposure to EV’ is enabled. |
| Shutter | Specified in units of 1/second, this parameter controls how long the camera’s Shutter is to remain open. As with the ISO parameter, it is not necessary (or even possible, in the interest of simplifying the camera’s operation) to adjust the camera’s Shutter directly when ‘Lock exposure to EV’ is enabled. |
| Lock Exposure to EV | Enabling this option disables the camera’s ISO and Shutter inputs, since with it enabled, it is not necessary to adjust them directly. |
| Motion Blur | Enabling this option will cause the plugin to export two different positions for the camera: a ‘previous’ and ‘current’ position. It is the difference between these two physical positions which will determine how Maxwell calculates motion blur in the rendered output. While the ‘previous’ frame will be calculated automatically during export of animations, it is also possible to set it explicitly by positioning the camera as desired and right-clicking the last button (Set camera Initial Position for Motion Blur) in the plugin’s Animation toolbar. Doing so will cause the camera’s position to be stored in order that it may later be used during export. |
Film Back
The parameters in this group are used to control the size and position of the camera’s film.
Size (w/h)
Specified in millimeters, these inputs simply determine the size of the film. When the plugin is set to use ‘Viewport’ Resolution Mode (more on this later), the plugin will manage the film size in such a way as to maintain a perspective match between the Rhino viewport and the rendered image.
Shift (x/y)
Specified in percentage, these inputs shift the film up/down and side-to-side in relation to the lens. This can be useful for setting up perspective-corrected shots of objects such as tall buildings where the camera should be located near the ground, but the entire building should be in the frame. Normally, this would require tilting the camera up, but by using lens-shift, the camera can be kept horizontal, and the film shifted downward in relation to the lens, thereby bringing the entire building into the frame without introducing perspective distortion. Here is a quick comparison of the two methods (camera-tilt vs. film-shift):
tilt |
shift |
|---|


Heads-up Display
Since the Rhino viewport does not have the ability to show the effects of film-shift, or even of non-35mm film types, the plugin provides a specialized tool, the Heads-up Display, to assist you in setting up shots like this. To activate the Heads-up Display, click the ‘Toggle Heads-up Display button in the plugin’s camera toolbar:

The Heads-up Display is an overlay that the plugin draws in the Rhino viewport, which shows how the current view will look once the film size and shift have been applied. Using the preceding example, here is how the Heads-up Display helps you to visualize the effect of your Maxwell camera’s film settings (the color of the overlay can be adjusted using Options > User Interface > UI Preferences > HeadsUpHatchColor):


Lock film ratio
When this is checked, then the plugin will maintain the current width-to-height ratio of the film when either one is adjusted. As the Output Resolution is tied directly to the size of the film being used, enabling this option also has the effect of constraining changes made to the Output width or height in such a way as to maintain the film ratio.
Output Resolution
By default, the camera uses what is called the ‘Viewport’ preset. When this is the chosen preset, the plugin will manage the output resolution based on the physical size of the associated viewport. If, at any time, manual changes are made which affect the image or film size, the camera will switch to using the ‘Manual’ preset. When this is the case, the plugin will not actively change the image or film sizes; what you enter will be what is rendered. The remaining presets in the drop-down operate the same as the ‘Manual’ preset and are just provided for convenience.
Aperture
The parameters in this section control the lens type, and the angle and number of blades used in this camera’s aperture, when the Diaphragm type is set to ‘Polygonal’. These properties affect the ‘bokeh’ effect (which may be further customized using the Custom Bokeh parameters) seen in highlights located in out-of-focus portions of the image.
Z-Clip Planes
When enabled, Maxwell Render will clip any geometry nearer or further than the Near and Far distances defined here. These planes may be set interactively using the commands provided in the Cameras toolbar:

If Osnap is enabled, the distance is set to the intersection of the view vector and a plane which is perpendicular to it, and coincident with the current Osnap point.
