Rhino 5 - Material Editor
The plugin implements a custom material editor, which is very similar in operation to Maxwell's MXED standalone material editor:
To open the material editor, click Maxwell > Plugin Windows > Material Editor, or the appropriate button in the plugin’s Tools toolbar. The main difference between the two is that while MXED is used to edit Maxwell MXM files, the plugin's material editor is used to edit embedded plugin materials. To create a new material:
- in the Material Editor’s Options menu, choose New material, New Emitter, or material Wizard.
- in Scene Manager > materials, right-click and choose New material, New Emitter, Import MXM, or material Wizard.
- in Database Manager > MXM Browser, choose a folder and drag an MXM file into the scene.
On Materials and Maxwell MXM Files
Firstly, it is important to recognize that there is a difference between an MXM file on your hard disk and a Maxwell material contained in a Rhino file – they are not the same thing, though they are very similar. It is necessary for the plugin to have its own ‘version’ of Maxwell MXM materials, so that it can save them directly inside of Rhino documents. If it did not do so, Maxwell materials could only exist as file paths stored in the document which link to MXM files on your disk. While this is entirely possible to do, and even preferable for some workflows, but it means that in addition to a Rhino file, you also need to bring along any number of physical MXM files with you when you want to transfer a document from one machine to another. Furthermore, it is prone to error, since directory structures most likely will not match from one machine to the next, and this often results in broken MXM links, and material assignments which do not produce any valid Maxwell material during export.
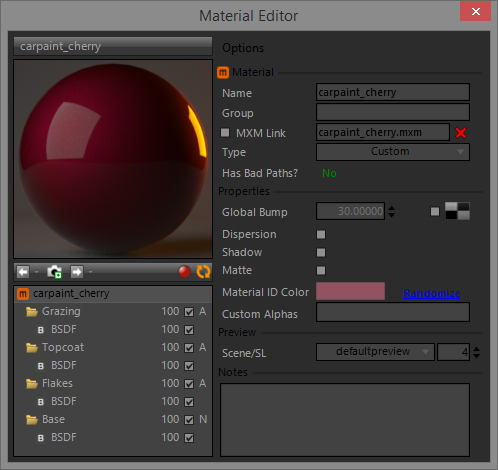
As such, a Maxwell material in the new Maxwell for Rhino plugin may operate in one of two ways: either linking to an MXM file on your machine, or simply embedded in the Rhino document. To control whether a material behaves as Linked or as Embedded, use the MXM Linking section in the material’s top node in the Material Editor:
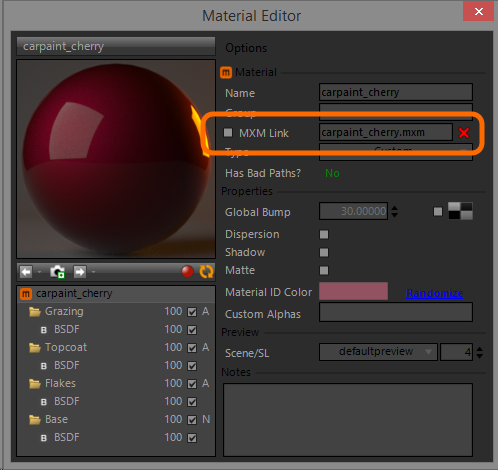
In order for a material to use Linked mode, it is necessary that its source MXM path points to a valid MXM file. The border color of the preview image indicates the MXM link state of the material:
Linked (MXM found) |
Linked (MXM missing) |
Embedded |
|---|


How does MXM Linking work?
MXM Linking is completely optional; that is, the full definition of the material is always stored (i.e. embedded) in the Rhino document. This ensures that no matter where you open a Rhino document, it will still be able to be rendered in Maxwell the same as it did the last time it was saved. How it works in practice is this:
- A Rhino document is opened.
- The plugin reads the materials stored inside.
- For each material which was saved with MXM Linking enabled, the plugin reads its source MXM path, and checks whether an MXM file is found at this location.
- If the MXM file is found, the material is immediately updated with the contents of that MXM file. If however, the MXM file is not found, nothing further happens – the definition of the material which was found in the document will be used at render-time.
Therefore, the MXM Linking feature of the plugin offers the ability to link central MXM files in individual Rhino documents, allowing you to change how materials in multiple documents render just by editing one MXM file, while simultaneously handling scenarios where a specified MXM file is not found, or where the material is not set to link to any MXM file at all.
The plugin also provides a special mode which may be used to defeat this process entirely, in case you have a document which you know has linked materials contained inside, but you do not want them to update themselves. This is found at Options > Behavior > Ignore Linked MXM Mode. When this option is enabled, all materials will behave as though they are using Embedded MXM Linking.
The other plugin options which are concerned with MXM Linking are:
- Options > material Defaults > MXM Mode
- Options > Behavior > Auto-update Linked materials
The material Defaults > MXM Mode option simply determines whether new materials will have MXM Linking enabled. The Behavior > Auto-update Linked materials option determines whether or not linked materials should actively listen for changes to their linked MXM files. When this is enabled, then any changes made to an MXM file will immediately be reflected in any materials which link to it. When it is disabled, the only time a linked material updates itself is when the document it is contained in is opened – it may be modified during the session, but any changes will be lost the next time its document is opened (unless Options > Ignore Linked MXM Mode is enabled, of course).
By now, you may be asking, what is the real purpose of all of these options? Why are they necessary? The answer is simple: some workflows require materials to behave in an embedded manner, and not to hold any external relation to an MXM file, while other workflows require materials to behave in a way such that they always use the current state of an MXM file. Generally, where you have multiple people working on a project, and you want them all to use the same MXM file for certain materials, you would want to adopt a linked model of working. That way, it becomes possible to use Maxwell’s MXED Material Editor to edit a single MXM and have the changes take effect in all documents which link to it. To establish this workflow, you would want to set your options as such:
- Options > material Defaults > MXM Mode = Linked
- Options > Behavior > Ignore Linked MXM Mode = No
- Options > Behavior > Auto-update Linked materials = Yes
Doing so ensures that any new materials created from MXM files will use linked mode, that they will actively listen for changes being made to those MXM files, and that they will update themselves whenever the documents they are contained in are opened.
If, on the other hand, you prefer that each material always maintain its as-saved state in the document, then you would want to set those options such that:
- Options > material Defaults > MXM Mode = Embedded
- Options > Behavior > Ignore Linked MXM Mode = Yes
- Options > Behavior > Auto-update Linked materials = No
Doing so ensures that all new materials will be created using embedded mode, and that any which were created by importing MXM files will never attempt to update themselves. At any time, it is possible to manually re-load a material’s source MXM file, either by using Material Editor > Options menu > Reload Linked MXM, or by checking the ‘Linked’ checkbox.
Options Menu
The material editor's Options menu contains commands for creating materials, and importing or exporting MXM files.
| Command | Function |
|---|---|
| New Material, Emitter, Extension | These simply create a new material and add it to the scene’s material List. New material creates a default grey diffuse material, New Emitter creates a default emitter material, and New Extension creates a material that uses one of Maxwell's Material Assistants. |
| Import MXM | This prompts you to select an MXM file from your disk. If you do, a new material is created in the scene, and the state of the chosen MXM file is imported into it. |
| Load MXM | This item will prompt you to choose an MXM file. Once chosen, the file will be loaded into the current material. Any objects this material is assigned to will now be using the newly-loaded MXM data. If Options > material Defaults > MXM Linking is set to Linked, this material will be set to Link the chosen MXM file. |
| Save As MXM | This item exports the current material as an MXM file for use in Studio or other plugins. If the material currently has no Source MXM path, then it will be set to use the path chosen here (the material will not be set to use Linked MXM mode, but it will be easy to Link the exported MXM later, if desired). |
| Enable/Disable Textures | These items are context-sensitive, that is, they will only appear when it makes sense for them to. They simply do what their names imply: enable or disable all textures in the current material. |
| Reload/Update Linked MXM | These items are also context-sensitive, meaning that they will only appear when the material has a valid linked MXM file. When this is true, that MXM file can either be re-loaded into the material, or the current state of the material can be exported, overwriting the MXM file. |
Material Overview Pane

This portion of the Material Editor window is used to control the global state of the material.
| Item | Description |
|---|---|
| Material Name | This simply shows the name of the current material. When the material’s preview is being refreshed, it shows the current sampling level of the preview-refresh render. |
| Material Preview | This shows the preview image for the current material. This may be re-rendered by double-clicking on the image, or by clicking the ‘Refresh Preview’ button in the toolbar below. |
| Real-time Preview | This toggles whether or not the material editor automatically refreshes the material preview whenever a parameter changes in the material. It can be desirable to disable this, for example, when Fire is currently rendering; material changes will be instantly viewable in Maxwell Fire, so you may not care so much about seeing them in real-time in the material editor as well, seeing that it will slow down Maxwell Fire to some degree. |
| Refresh Preview | This button either starts a preview-refresh, or quits the preview-refresh routine, if it is running in the current material. |
Material Snapshots
The material editor's Snapshots feature allows you to store the current state of a material at any time, and to recall that state later on, if desired.

By clicking the ‘Take a Snapshot’ button’, you store the current state of the material. This copy then is accessible by clicking the ‘Back’ button. To move back to where you were, click the ‘Forward’ button; this is designed to work in a way similar to a standard web browser. As such, adding a new snapshot will clear any which are currently shown in the ‘Forward’ drop-down.
The snapshots do not operate as static copies; when you have switched to a certain snapshot, and you make edits to the material, these edits will not be lost again when moving to a different snapshot. That is to say, snapshots are ‘live’ materials.
material Snapshots is a runtime-only feature, meaning that these versions are not stored in the document. If you have made edits to a particular snapshot, and you wish both to move to another, but not to lose the edits you’ve made, simply make that snapshot current and then, in the Scene Manager’s materials page, right-click the material and choose ‘Clone material’. The clone will not have any snapshots, but it will be a duplicate of the current state of the material it was cloned from. After this clone has been created, go back to the original material and return its state to the snapshot you wish it to use.
It should be noted, the snapshots feature is not designed to be used when a material is using Linked MXM mode. You are not prevented from taking snapshots of such a material, but the feature is rendered somewhat useless, since moving between snapshots causes a re-load of the material, and this in turn causes a re-load of the Source MXM.
Layers Tree
Similar to the tree found in MXED, this control allows you to define the structure of the material. New components are added by right-clicking the desired parent component and choosing what to add (i.e. right-click a Layer to add a BSDF). Child components may be re-ordered under their parent by dragging them from their current position and dropping them on their parent node; this will put them at the top of the list.
To re-order components in the tree, drag an item and drop it on its parent node; it will be inserted at the top of the list. Components may also be copied by holding down CTRL while executing a drag-drop action; rather than moving the dragged component, a copy of it will be added to the target node.
Additionally, individual components may be dragged back and forth between the Layers tree and the various pages in the Database Manager; this makes it easy to build new materials from predefined components.
Material Editor Pages
Clicking on a node in the layers tree causes the user interface appropriate to the selected node type to be shown in the material editor:

For example, it is the 'material' node which is selected in the image above; this will cause the Material Page, described below, to be shown in the right side of the material editor.
Material Page
The parameters in this page apply to the material as a whole. Each material saves its own preview options, so that different MXS preview scenes may be used for different types of materials. The MXS preview scenes listed in the scene drop-down are those found in the Maxwell/preview directory.
As explained in the ‘How does MXM Linking work’ section above, a material which has MXM Linking enabled (and has a valid linked MXM path) will re-load the linked MXM when the document it is contained in is opened. When the plugin option Behavior > Auto-update Linked materials is enabled, such a material will also actively listen for changes made to its linked MXM.
In addition to specifying individual bump maps in each BSDF layer, it is also possible to supply a bump (or normal) map here which will be used to affect the material as a whole.
| Dispersion | This switch enables the calculation of dispersion. Dispersion is the ‘rainbow’ effect seen when light is split based on its different wavelengths as it passes through refractive materials. Enabling this option can raise render times because of the extra math involved in calculating these wavelength-based refractions. |
| Matte | Materials which have this switch enabled will cause the background (i.e. Physical Sky, etc.) to show through all geometry where the objects they are assigned to are seen by the camera. This can be useful for creating composite images. |
| Shadow | Materials which have this switch enabled will have the objects they are assigned to casting shadows when the Shadow channel is rendered (see Output > Render Channels > Shadow). |
| Material ID Color | This is the color which will be used for this material when the Material ID channel is rendered. |
| Custom Alphas | A comma-separated list of Custom Alpha channels, in which objects using this material will be included. |
Layer Page
The operation of this page is similar to that of the Layer page in MXED. As a shortcut, the Layer Blending parameter may be set either by using the drop-down list in this page, or by clicking the small A/D toggle in the Material Editor Layers Tree.
BSDF Page
The operation of this page is similar to that of the BSDF page in MXED. When certain parameters in the page are grayed-out, it means that they would have no effect; they will become enabled when other parameters have been changed in such a way as to make them effective.
As the BSDF page is taller than the minimum-height of the Material Editor, it includes collapsible Reflectance, Surface, and SubSurface groups; their operation is the same as that of collapsible groups in the Scene Manager, and the plugin remembers the expanded/collapsed state of each group across sessions. When the Material Editor is sized in such a way as to hide part of the BSDF page, you can ‘grab’ the page by clicking down the left mouse button and then drag it up and down. By design, it does not show a scrollbar, due to the limited space available, and also because if it did, the mouse-wheel adjustments made to numeric textboxes would scroll the page up and down rather than adjusting the value.
When Reflectance > IOR is set to ‘Measured Data’, all of the parameters in the Reflectance group will be hidden, since they have no effect in this case. Similarly, the min/max Thickness controls in the SubSurface group are only shown when (a) Single Side SSS is enabled, and (b) an SSS Thickness map is assigned and enabled.
Coating Page
The operation of this page is similar to that of the Coating page in MXED. Similar to the BSDF page, the parameters in the Reflectance group will be hidden when Reflectance > IOR is set to ‘Measured Data’, since they have no effect in this case.
Displacement Page
The operation of this page is similar to that of the Displacement page in MXED.
Emitter Page
The operation of this page is similar to that of the Emitter page in MXED.
Texture Editor
To open the Texture Editor, right-click on a texture button:

A material has, at most, one texture which is currently selected – which one is selected is changed by left-clicking on the corresponding texture-button (the button will take on a highlighted border). The selected texture will both be shown in the viewport, and in the texture editor. For example, in the material shown above, the first BSDF’s Reflectance 0 texture is the material’s selected texture, and right-clicking its button opens the Texture Editor, showing this texture and its parameters:
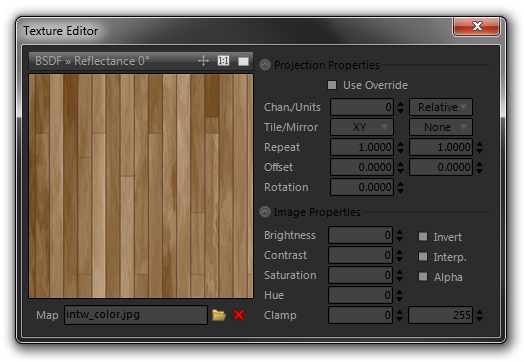
Preview
The texture preview shows the selected texture, including the effect of its projection and image properties. You can zoom & pan around the image using the mouse-wheel and left-mouse button.
Projection Properties
Normally, these parameters apply only to the texture currently being edited. However, when "Use Override" is checked, they show (and manipulate) the values of the material's so-called Override Map, instead of those of the current texture. The effect of this is to allow multiple textures in a material to share a common set of projection values.
Image Properties
These parameters are used to alter the image at render time.
General information on Texture parameters
The remaining parameters control how the texture is scaled and translated in texture-space. Tile X & Y can be enabled or disabled using the appropriate checkboxes, and their values are set using the numeric input box. When Real Scale is not enabled (Units box set to Relative), the meaning of Tile X & Y is roughly, ‘squeeze this many copies of the texture into the given space’. When Real Scale is enabled (Units box set to Meters), the meaning becomes, ‘make each tile x-number of meters wide’.
The Channel parameter allows you to associate different textures with the different texture-projections which may have been defined for the objects to which this texture is assigned. For example, some textures may use a cubic projector on channel 0, and a planar projection on channel 1. Each texture mapping, channel 1 & channel 2, represents a different set of UV coordinates. Setting the Channel parameter in each texture individually allows each texture to use whichever mapping is appropriate. If an object has fewer texture-mappings assigned than are specified in the various textures its material has, then copies of the channel 0 mapping will be created during export in order to accommodate those textures. This takes extra processing power, so it is always best to make sure that textures only specify as many different Channels as texture-mappings exist for objects which use them.
As a convenience, holding down the CTRL and/or SHIFT keys while adjusting texture parameters will affect where the changes take effect:
| Modifier | Function |
|---|---|
| CTRL | Changes will be applied to all textures in this texture’s parent layer. |
| CTRL+SHIFT | Changes will be applied to all textures in this texture’s parent material. |
To adjust numeric inputs, you can either:
- Type in a new value and move focus to another input.
- Click the small up/down-arrow buttons next to the input box to adjust the value.
- Click in the desired input box and roll the mouse-wheel up or down to adjust the value.
- Click down on the desired input box and move the mouse forward & backward to adjust the value.
In the first case, the value will be changed as soon as focus moves elsewhere; this allows you to type in a new value, then hold down CTRL and/or SHIFT to execute the change in multiple textures as described above.
Other Features
In addition to these conveniences, textures may also be drag/dropped from one texture to another. To do this, simply click down on the desired texture button and begin dragging it. This texture may now be dropped on any other texture button in this layer, or in another layer. To select another layer during the drag, drag the texture over the Material Editor’s layers tree to select a different layer; once the desired layer is visible in the Material Editor, drag the texture over and drop it on the desired target. If you simply drop it, only the texture’s path will be copied to the target; if you hold down CTRL while dropping the texture, then all of the parameters will be copied from the source texture to the target.