Rhino 5 - Object Properties
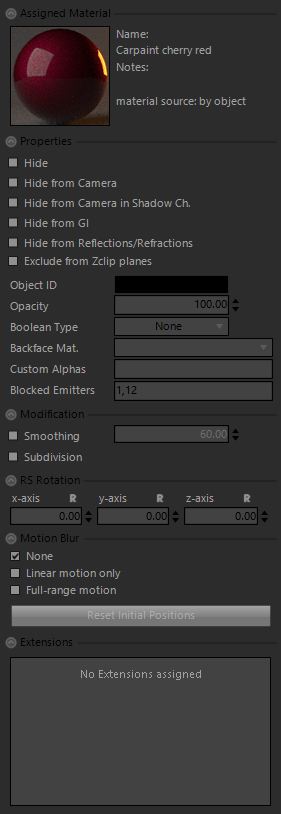
The plugin adds a new Maxwell page to Rhino's Object Properties window:
As with any Object Properties page, this page is context-sensitive, tracking the current object selection in order to shows relevant information about the selected objects. The page is divided into four main sections.
Assigned material
This section shows which material, if any, is assigned to the selected object or objects. It also indicates whether the material is assigned by object, parent, or layer. Clicking on the preview image opens or closes the plugin’s Material Editor.
Properties
This section contains checkboxes for enabling the various Maxwell object properties:
| Property | Function |
|---|---|
| Hide | When enabled, this object will be exported, but will be hidden. |
| Hide from camera | Hides this object from being seen directly by the camera. |
| Hide from GI | Hides this object from the global-illumination calculation. |
Hide from Refl. & Refr. | Hides this object from reflection/refraction calculations. |
| Hide from ZClip | Hides this object from Maxwell’s Z-Clip feature. |
| Object ID Color | Sets the color of this object when the Object ID channel is rendered. |
| Opacity | Sets the opacity of this object, irrespective of its material. |
| Boolean Type | Sets this object to be used as a Render Boolean, which cuts other geometry, rather than being rendered itself. |
| Backface Mat. | Sets the material to use on the backside of this object's mesh faces. |
| Custom Alphas | A comma-separated list of Custom Alpha channels, in which this object will be included. |
| Blocked Emitters | A comma-separated list of the blocked emitter object names for this object (if the object doesn't have a name you'll have to give it one in Rhino's Object Properties panel). |
Modification
The parameters in this section are used to modify meshes after they have already been exported, or during render time.
| Property | Function |
|---|---|
| Smoothing | This parameter may be used either to apply post-export normal smoothing, or to specify the smoothing used for objects which use Subdivision. |
| Subdivision | Specifies that this object should be subdivided at render time. Quad-mesh information is not lost in the export to MXS, so you should obtain superior results by exporting quads when possible, and using the Catmull-Clark subdivision scheme. For information on generating such meshes, please see the Rhino documentation on setting up custom mesh parameters. |
Real Scale Texture Control
When the assigned material’s selected texture has Real Scale enabled, and that texture uses Channel 0, then these x/y/z inputs may be used to adjust the attitude of that texture’s mapping. Real Scale mappings always use a cubic projection, so adjusting these values has the effect of rotating the theoretical mapping cube. To learn more, see the Real Scale tutorial.
Note that there is one very special case in which the Real Scale texture control's Z-Axis value is used for a very different purpose, and it has to do with experimental support for IES emitter directionality in this version of the plugin. When a Rhino spotlight is selected in the object properties page, and an IES-enabled emitter material is assigned to it, the Z-Axis value here may be used to rotate the IES lobe around its axis. This is useful because many IES profiles are asymmetrical. In the future, this functionality will be augmented and moved out of this Real Scale texture control (it is only used now since the feature is still experimental) and placed into an emitter-specific object properties page.
Motion Blur
The plugin supports Maxwell object motion-blur using two different strategies:
| Strategy | Description |
|---|---|
| Linear motion only | This may be used for objects which will only move in a straight line. Use this mode to save memory. |
| Full-range motion | This must be used for objects which will rotate or move in a non-linear way; this mode stores info for each mesh point. |
When one of these is enabled for an object, the plugin stores the object’s current position for use during export. At that time, the object will be written into the MXS file using both the stored position and its position at export-time. Maxwell will figure motion-blur based on the difference between these two positions.
At any time, an object’s ‘initial’ position may be manually reset by selecting the object and clicking the ‘Reset Initial Positions’ button. During an animation, both the ‘initial’ and ‘current’ object-positions will be figured automatically, frame-to-frame, by the plugin.
Extensions
This section holds a list of extensions (Maxwell Grass, Sea, and/or Volumetric) which have been assigned to this object. Using the context menu, it is possible either to create and assign a new extension, or to assign one that already exists.
MXS References
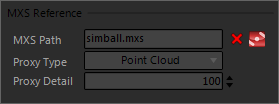
When the selected object is an MXS Reference, a different UI panel is shown:
Using the parameters here, it is possible to switch the reference between being displayed as a point cloud (built using a percentage of the mesh points contained in the referenced MXS file), a set of wire boxes, or a set of NURBS boxes. It is also possible to edit the referenced MXS in Maxwell Studio, by clicking the button on the right side of the panel.
Technically, MXS References are implemented through the creation of a block definition containing the point cloud (or box) representation, instances of which are then inserted into the model. As such, the values in this panel do not affect just a single instance, but rather that instance's definition, and therefore all instances of that definition. At render time, only one copy of the MXS is loaded; further references are exported as instances of the loaded MXS.

