Diffraction
- Systems Next Limit (Unlicensed)
- Next Limit
- Anonymous
Diffraction effects (also known as Glare) occur when light goes through small holes, causing interference patterns in the shape of the lens aperture. Light will always cause slight interference patterns because of the optical components used, causing the visual “artifact” known as glare.
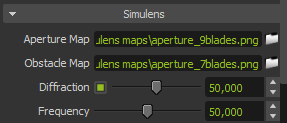
- Aperture Map: The shape of the diaphragm will model the pattern of light that reaches the film. For example, a circular diaphragm will create circular patterns; a hexagonal diaphragm will create 6 light streaks. You can set the diaphragm shape using a black & white or color map called the aperture map.
- Obstacle Map: Water drops, eyelashes or dirt on the camera lens will also cause diffraction effects. A black & white map called the obstacle map is needed. If you do not want to use an obstacle map, you can leave this path blank: you only need an aperture map for diffraction to work. However, if you do want to use an obstacle map, be aware that it is necessary to load an aperture map as well.
- Diffraction: Control diffraction/glare intensity.
- Frequency: Control the frequency of coloring in the diffraction effect. Higher values will make the patterns denser.
The aperture map and obstacle map must have the same resolution. Your render and the maps used do not always need to have the same resolution, but the more similar they are in resolution, the less diffraction distortion you will get. The aperture map should be black with white specifying the shape and size of the aperture. The obstacle map should be white with black areas specifying dirt or scratches on the lens surface.

Some of the aperture maps included in the Maxwell installation

Some of the obstacle maps included in the Maxwell installation
The Diffraction effect can also be applied to any high dynamic image. Simply load a HDRI using the File> Load Image option and apply Diffraction to it.
Note that the Diffraction effect (as Scattering as well) will be more visible the stronger the light source is. For example, if the camera sees the sun or a strong emitter, these will have a stronger diffraction/scattering effect. Indeed, the Diffraction and Scattering effects (glare and bloom) will still be visible in the scene even if no direct light sources are seen by the camera, but the effect will be weaker.
Do not enable any Simulens setting before starting the render as these settings need to be calculated for each image update in the main render window. This will add extra render time and also increase RAM usage during rendering, especially for high resolution renders. Instead, wait until the render has reached an acceptable SL for viewing the Simulens effect, stop the render, apply a Simulens effect to give you an idea of its influence, then disable the Simulens again and resume the render.
For adding Simulens effects to a range of MXI files after the render is completed, use File>MXI Batch Processing. This tip does not apply to the Devignetting effect which does not use more RAM or calculation time, you can enable it before starting the render.