Timeline and Playback
At the UI's bottom you can see the timeline. Let's go through its associated elements one by one from left to right:

Jump to
Lock/Unlock Button (A)
When the timeline is locked then you will not observe any progress in time. This means that the simulation is running, but frames are not incremented – the simulation is performed at a single frame, e.g. 0 or 50. As a side effect, animation data will not be evaluated. In order to unlock the timeline, stop the simulation with a click on “Simulate”, and click on the button again.
An example about how to use the “Lock/Unlock” button can be found → here.
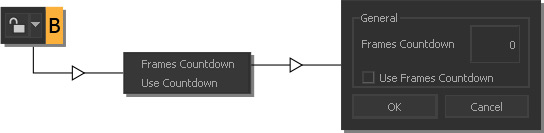
Lock/Unlock Menu (B)
Next to the ”Lock Button” you can see a small triangle. A click on it reveals a context menu, giving you the possibility of specifying a frame when the simulation will be unlocked (RealFlow counts the frames internally). Please take a look at → "Quick Start Workflows - Timeline Locking".
Simulation Start Frame/Playback Start Frame (C)
In order to change the simulation's start please enter a (positive) frame number here. The start frame will be displayed in the timeline bar as a black number. During playback, this field defines the point in time when playback will start.
Timeline Bar and Timeline Slider (D)
The length of the timeline bar is adjusted dynamically, and depends on the “Simulation Stop Frame” (see below). The grey rectangle is the timeline slider, and you can move it back and forth to scrub the timeline. Please bear in mind that real-time playback is not always possible – in particular with very high particle or object counts.
- If your scene contains animation data from imported objects you will see an additional black line indicating the frame of the last animation key.
- An orange bar indicates the frames that have already been simulated.
- Red lines stand for a scene node's animation keys.
Playback Stop Frame (E)
This field contains the frame when playback stops. If a scene contains imported objects “Playback Stop Frame” is set to the frame of the last animation key. This can also be 0, and in this case playback will not start. “Playback Stop Frame” can be different from “Simulation Stop Frame”, but not greater.
Simulation Stop Frame (F)
Here you can enter the frame when the simulation process will stop automatically. Of course, it is possible to interrupt a simulation at any time, and resume by clicking on the → “Simulate” button. The maximum stop frame is 999,999,999.
Update Timeline Cache Button (G)
RealFlow writes a simulation's data to disk, and this process is called caching. There are circumstances where the cached frames are not displayed or connected to a scene's node. Typical examples are:
Closing and opening RealFlow, loading a project file from disk.
Simulation in → command line mode.
Disk location of the cached files has changed.
In the first two cases, the previously cached data can be loaded with this button or the Alt + U shortcut. If the files' location has changed you have to reconnect the scene's nodes to the files via → “Export Central” or restore the original location.
Go To Last Cached Frame Button (H)
Simulated and cached frames are indicated through an orange bar in the timeline. You can jump to the end of this bar directly with this button.
Playback
The elements of this area should be familiar to you, since you can find them in any 3D program, and electronic devices, such as media players of any kind. The elements are (from left to right):
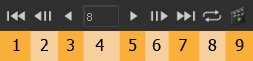
1. Go to first frame | 2. Go one frame back | 3.Play backward | 4. Current frame | 5. Play forward | 6. Go one frame ahead | 7.Go to last frame | 8. Loop | 9. → Create OpenGL preview