Command Line Simulations
RealFlow's command line is a convenient method to accelerate the simulation process. Typically, simulations are 30% faster with this method. The command line version can be triggered manually via a terminal application, but it is more convenient to do that from RealFlow's GUI version directly:
- Prepare the scene and make it simulation-ready.
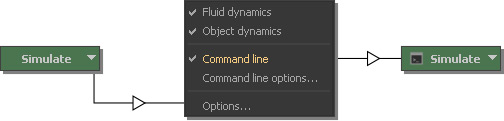
- Right-click on the small triangle next to the “Simulate” button and choose “Command line”. The “Simulate” button changes and now carries an icon.
- Click on “Simulate” to trigger the command line version.
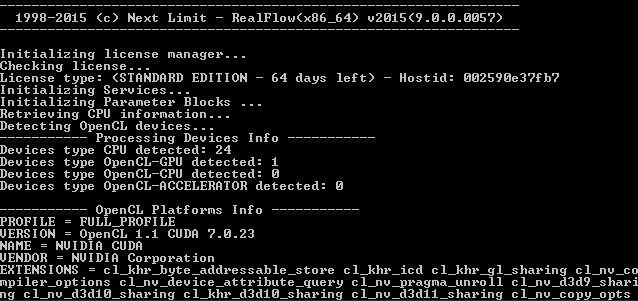
- A terminal window appears with information about the simulation's progress (see example below).
- Keep RealFlow's GUI version open.
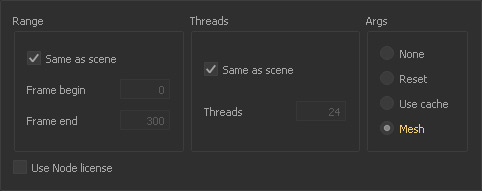
You can also use a computer with a "Node" license for the simulation instead of the "Standard" GUI version. The remote computer must be available in the network and requires a proper license. All you have to do is to enable the appropriate option the "Command line options..." (see screenshots below: "Use Node license"). For more information on the command line version read the following subchapters:
Monitoring the Simulation
Of course, the simulation currently running has to be checked and evaluated from time to time:
- Return to RealFlow's GUI version
- Press Alt + U to update the already simulated parts – these frames are displayed in orange.
- Move the timeline slider to the desired frame to see the result.
Simulations with Initial States
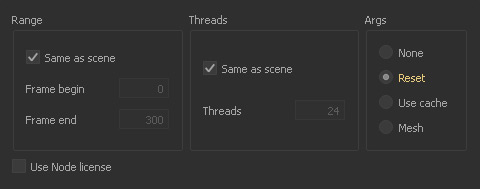
When you want to start a simulation from an initial state you have to enable the "Reset" flag in the "Command line options":
Interrupting and Resuming Simulations
Command line simulations cannot be interrupted and resumed in the same way as GUI simulations – they are terminated and triggered again:
- Close the terminal window to abort the running simulation.
- Return to RealFlow's GUI version and update the timeline cache with Alt + U.
- Right-click on the small triangle next to the “Simulate” button and choose “Command line options...”.
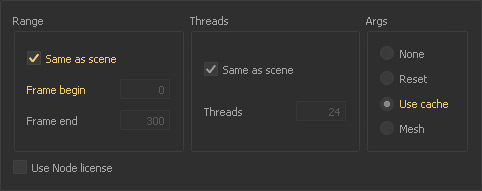
- Deactivate “Same as scene”.
- To be on the safe side, enter the number of the next to last simulated frame under “Frame begin”.
- Activate “Use cache”.
- Close the window and click on “Simulate”. The new simulation will start from the entered frame.
Meshing
You can create meshes via the command line as well:
- Make all necessary mesh adjustments.
- Right-click on the small triangle next to the “Simulate” button and choose “Command line options...”.
- Activate “Mesh” (see image below).
- Close the window and click on “Simulate”. The meshing process starts in a terminal window.
Maxwell Render Previews
Even Maxwell Render jobs can be done with the command line version:
![]()
- Prepare the scene and make it render-ready (apply materials, set visibility etc.).
- There must be a “Camera” node (Display shelf > Camera), otherwise the render will not be started.
- Switch to camera mode with the 5 key.
- Display shelf > Maxwell Scene Preferences
- Adjust lighting, quality, engine, sampling level etc.
- Display shelf > Send to Maxwell Command Line
- A terminal window appears and the render process starts.
You can monitor the render process with RealFlow's “Movie Player” and see the completed images:
- Layout > Movie Player
- Click on the folder icon and load one of the images.
- The player will assemble an animation and shows it in the canvas.
Warning Message with Hybrido Secondary Fluids
It might happen that you see a warning when you simulate Hybrido secondary fluids such as splashes or foam via the command line:
failed to create a temporary copy of drive:\path\file.vdb for delayed loading <IoError: failed to open temporary file \path\file>;
will read directly from drive:\path\file.vdb instead
This is message is related to the (external) OpenVDB library, and not a RealFlow-specifc issue – it can be ignored.