/
Liquid - Calm Fluids
Liquid - Calm Fluids
- thomas (Unlicensed)
Owned by thomas (Unlicensed)
Calm fluid surfaces are required in many situations. A common approach is to use a → “Fill Object” emitter to create a fluid volume. But, once you add a → “Gravity” daemon the fluid collapses and sloshes heavily. To avoid this, follow these steps:
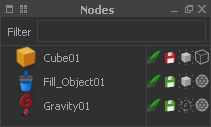
Only three nodes are required to fill a cube.
- Create your setup, for example as show above, and → lock the timeline.
- Simulate until the fluid is halfway settled.
- To speed up the simulation press Alt + D and prevent the scene from being updated in the viewport.

Lock the timeline (left button).
At this point the first initial state is created. Go to the emitter's “Node Params” panel and open “Initial State”:
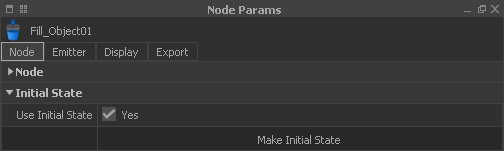
- Enable the emitter's “Use Initial State” and click on “Make Initial State”.
- Activate “Reset To Initial State” and press “Reset” (see image below)
- Unlock the timeline.

Reset to an initial state.
Add a → “k Speed” and a → “Drag Force” daemon
- Enter the values as shown below.
- Create → animation keys for “Max speed” and “Strength” by clicking on the small circles – they turn red.
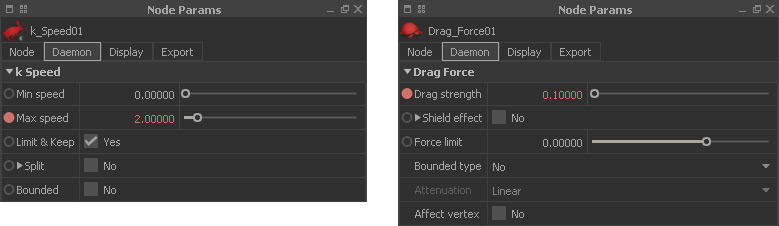
Create another two keyframes at frame 100 with these values:
- k Speed > Max speed > 0.01
- Drag Force > Strength > 200
- Reset again and simulate.
In the emitter's “Statistics” panel (only available for standard fluid emitters under “Node Params”) you can watch the maximum speed decreasing. After a while the fluid surface is calm:
- Stop the simulation.
- Create another initial state.
- Delete the “k Speed” and “Drag Force” daemons or → deactivate them (“red rocket” icon).
- You will see some faster particles in the inner body of the fluid, but it is important that the surface is calm.
Now you can add the remaining scene elements and proceed with the simulation.
Related content
Calm Fluid Surfaces
Calm Fluid Surfaces
More like this
SPH - Fill Object
SPH - Fill Object
More like this
SP - Fill Object
SP - Fill Object
More like this
Liquid - Foam
Liquid - Foam
More like this
SPH - Particles: Script
SPH - Particles: Script
More like this
SP - Particles: Script
SP - Particles: Script
More like this