Working with objects and instances in Studio
All the objects and groups of objects in your scene will appear in the Attributes Panel. Please see that page for more details on all its functionality.
Object display modes
Maxwell Studio has 8 display modes in the OpenGL viewport, suited for different tasks. They can also help speed up the viewport with Bounding Box mode being the fastest. Depending on your graphics card capabilites Shaded mode or Textured mode may be faster than Hidden Line mode.
Display mode from left to right: Bounding box, Wireframe, Hidden Line, Flat, Toon, Shaded, Textured Decal, Textured
Setting the display mode
You can set the display mode for objects from two locations: From the Display mode menu at the top of a viewport, and also from the Appearance section of the Attributes Panel: Object. The shading mode that will be displayed in the viewport will always be the most “basic” mode chosen. For example, if you set “Bounding Box” (lowest shading mode) as the shading mode for an object in the Object parameter panel, but set the viewport to Shaded mode, the object will be displayed in Bounding Box in the viewport. On the other hand, if you set the viewport to Wireframe but set the object shading mode to Textured, the object will be shown in Wireframe because it is a lower shading mode than Textured mode.
This functionality allows you to combine different display modes in the viewport - for example displaying only a few objects in Shaded or wireframe mode and the rest of the objects in bounding box mode to speed up the viewport.
Selecting objects
- In the viewport: Shift to add to a selection, Ctrl to remove from a selection. You can also drag a marquee around a group of objects to select them all. Anything that the marquee touches will be selected.
- In the Object List panel: Ctrl to add one item at a time to a selection, Shift to add several objects to a selection (similar to working in any file explorer)
To be able to select objects in the viewport you have to be in object selection mode:
The Object Selection Mode (left most button)
When you select one or more objects, the Attributes Panel: Object becomes active allowing you to change different transform/render/UV settings for the selection. By selecting more than one object you can change the settings for all of them at the same time.
Display selection mode
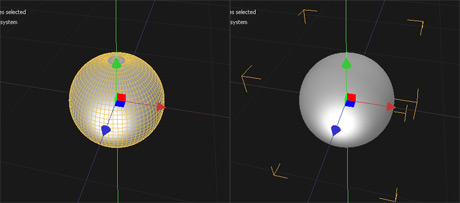
When you select an object, by default its wireframe is shown in a bright orange color to clearly see it is selected. For objects that have many polygons this might get difficult to see the texture applied to the object while you are editing its UVs for example. To make it easier to see the texture underneath for selected objects, you can choose to indicate a selected objects with brackets around its boundin box instead. Go to File>Preferences>Viewport Rendering and set the "Display selection mode" to Brackets.
Wire vs Brackets display selection mode
Selecting by keyword
Right click in the Object Parameters panel and choose Select by keyword. You can use the * sign as a wild card:
- Typing C* will select all objects starting with the letter C.
- Typing *ere for example will select all objects that contain the letters in order "ere" such as Sphere.
Selecting by material
You can also select objects that have a particular material applied to them. Right click in the Materials List Panel and choose Select Assigned Objects.
Transforming objects
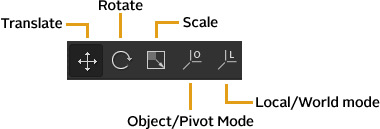
With an object or a group of objects selected, the transform gizmo appears in the viewport allowing you to Translate, Rotate, Scale the object/group (depending on the transform tool you have selected from the tool bar).
- The Object/Pivot mode allows you to switch between moving the object or moving the objects pivot only.
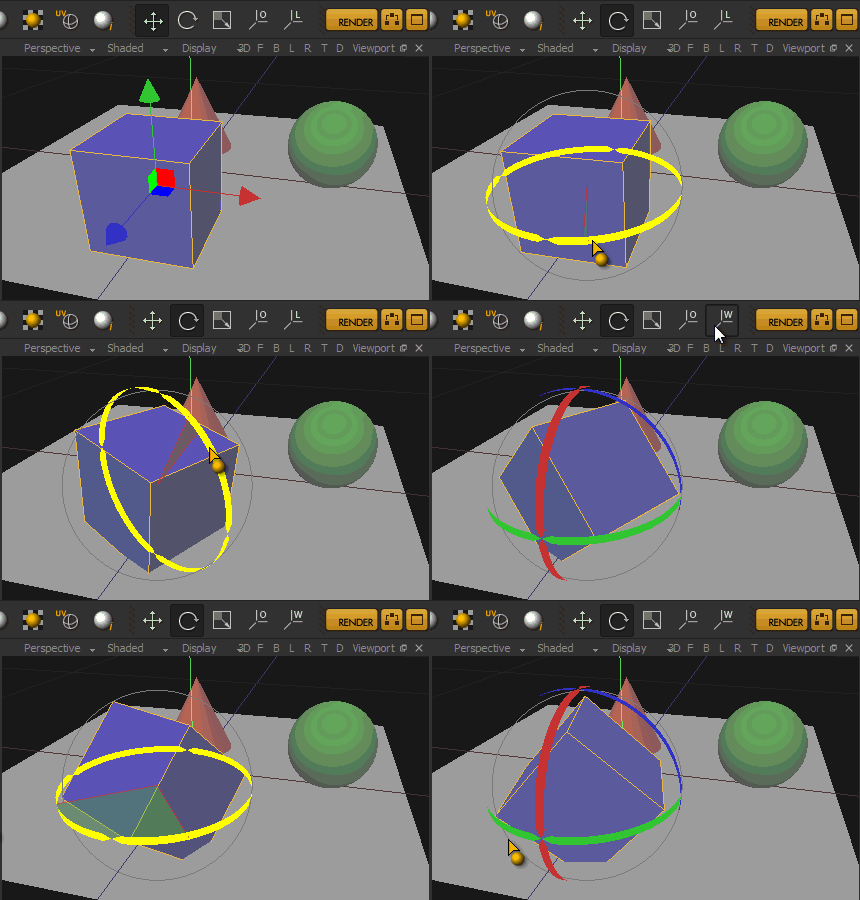
- The Local World/Mode allows you to transform the object relative to its local coordinates or to the fixed world coordinates. Most of the times you will work in the default Local mode, but sometimes it can be useful to use World mode, especially when rotating objects.
If the transform gizmo appears too small or big you can increase/decrease its size by pressing Alt and the numeric plus/minus keys on your keyboard
Changing the pivot of an object
Switching between local and world mode.
Center and Reset the objects/groups pivot
With an object or group selected, in the Attributes Panel: Object, click the Center button to center the pivot on the objects/groups bounding box, or click Reset which will move the pivot to the 0,0,0 world coordinates. Centering the pivot can be useful for imported objects but keep in mind it can't always work as expected.
Transforms using the numeric inputs
Besides direct manipulation using the gizmos in the viewport, you can also directly type in values in the Attributes Panel: Object. Some tips for working with the numeric inputs:
- you can change one value and then press Shift + Enter to change that value for all three axis at the same time.
- you can change the decimal values for more precise transforms - simply right click on a numeric input, choose Decimal precision and pick the number of decimals you want.
- clicking the up/down arrows will change values by a whole number.
- pressing the MMB (or the mouse wheel) and sliding up/down in the arrows area will change the values continuously by decimal values. You can also press Ctrl to allow bigger changes.
Creating hierarchies of objects
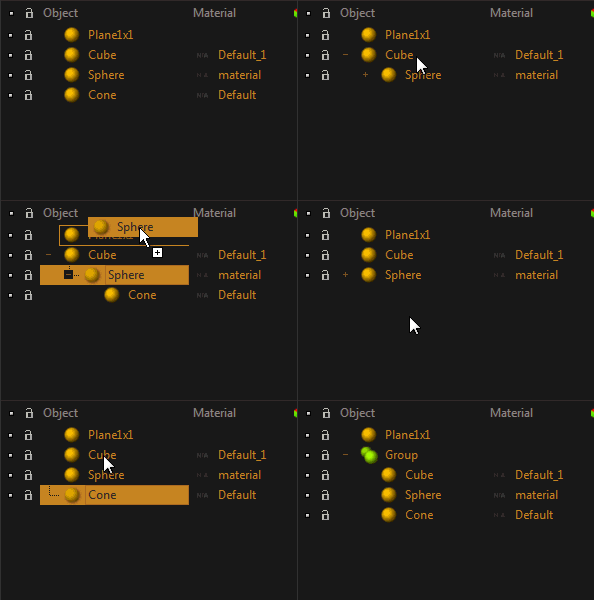
Maxwell Studio allows you to group objects under a parent object, or create a group from a selection of objects. This is all done by drag & drop in the Objects List. Drag & drop an object over another object to make it a child of that object, or select a few objects in the object list or in the viewport and press Ctrl + G (or right click in the Object List panel and choose Group). To ungroup objects, select it, right click in the Object List panel and choose Ungroup.
Creating hierarchies and groups with drag & drop
Transforming groups
When you select a group in the Object List panel, a gizmo will also appear in the viewport which will be placed in the middle of all the objects that are in the group. You can translate/rotate/scale a group just like any other object.
Advantages of working with groups
- You can better organize your scene by elements that belong together
- You can apply a material to a group directly and its children will inherit the material. If you want to keep the material assignment that children objects already have, but apply a material only to objects that have no material applied, hold Shift while drag & dropping a material from the Materials List Panel on top of a Group.
Instances
Creating an instance
Select an object, right click in the Objects List panel and choose Instance. The instance will be listed in the Objects List and highlighted with a blue icon.
Deleting an instance
Select one or more instances in the Objects List and press the Delete key or right click and choose Remove like any regular object.
Transforming instances
Instances of an object can have a different position/scale/rotation that the original object and different among them. Instances are transformed in Studio just like regular objects, so select the instance to transform and use the transform gizmos or the numerical fields to move, rotate or scale it.
Assigning materials to instances
At first an instance will inherit the material from the original object, but you can assign any other material to each instance, by simply dragging a material from the Materials List over the instance. It is also possible to remove material assignments in instances by selecting the material in the Objects List and clicking the “Del” key. In absence of any assigned material, an instance will inherit the material of its original object.


