Table of contents:
| Table of Contents | ||
|---|---|---|
|
Maxwell Render - ready for VFX?
...
MultiLight is still one of Maxwell's most appreciated features - it allows you to change the intensity (and optionally also color) of any light in your scene - during and after rendering. You can adjust them also as separate channels directly in your compositing application using our plugins (currently Nuke, After Effects, Photoshop). With ML on, it's a matter of a few clicks to turn a daylight render into a night time one, or completely change the mood of a scene - all without having to re-render. Please see below for tips on working with ML.
...
Easily controlled true 3D motion blur with unlimited substeps, accurate displacement (incl. vector displacement), instancing, MXS referencing, high quality materials, subsurface scattering, hair/fur, grass, emitter settings using real world values, real world film/photo camera settings (incl. anamorphic bokeh effects), accurate reflected/refracted caustics, RealFlow connection for rendertime meshing of RF particles (included with each license of Maxwell), IES lights...
MXI file
During the render, Maxwell generates an image file (in your desired image format: exr, tiff, tga, jpg...) plus another image file in the proprietary MXI format (stands for Maxwell Image format).
...
Distributed rendering is certainly not a feature unique to Maxwell, but an advantage over traditional render engines is that Maxwell scales almost linearly both with the number of cores in the processor, and also when you increase the number of render nodes in the farm. The graph below shows a test representing the performance speed obtained with different number of cores on a multi-core computer. The graph displays an unrivaled almost linear performance (close to the 100% percent theoretical limit). 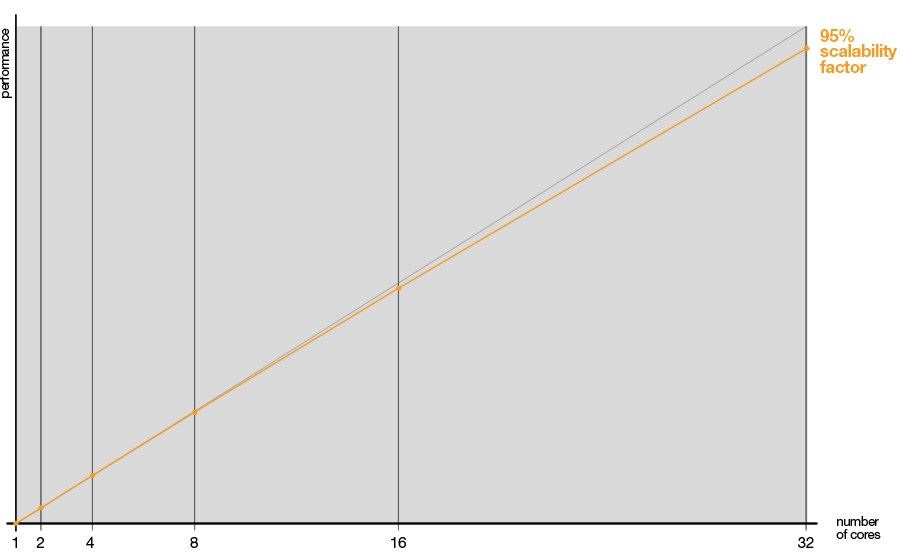
...
Test performed on a 32-cores Windows 2003 Server 64Bits reference computer
...
We strongly recommend to first of all read two short sections in our documentation which will help to avoid excessive render times and bad looking renders.
Installation and Licensing
The easiest way of installing Maxwell is through the installer (provided for Windows, Mac and Linux). The installer just copies a set of files and folders inside the installation folder chosen by the user and also in Windows and Linux it creates a new environment variable called MAXWELL3MAXWELL5_ROOT which points to that folder.
To install Maxwell on many machines without running the installer in all of them it's possible to run the installer just in one node and then copy the Maxwell folder and set the MAXWELL3MAXWELL5_ROOT environment variable to the rest of the machines.
In Windows, to add
MAXWELL3MAXWELL5_ROOT to your environment, open your system Properties panel (Control Panel>System) and enter the Advanced System Settings section. Among the Advanced settings you will find the Environment Variables panel. Maxwell needs a System Variable pointing to the Maxwell application folder, so in the System Variables list, hit New to create a new environment variable, name it
MAXWELL3MAXWELL5_ROOT, and in its value enter the path to your Maxwell 3 application folder. This will indicate your system
whenwhere the Maxwell
componentcomponents are stored whenever it
neededneeds it.
In Linux, to add
MAXWELL3MAXWELL5_ROOT to your environment, assuming that you are using bash and maxwell is installed in
3.1/opt/local/maxwell-5, edit $HOME/.bash_profile and add this line:
| Code Block |
|---|
export |
...
MAXWELL5_ROOT=/opt/local/maxwell- |
...
5 |
If you use csh or tcsh, edit $HOME/.cshrc and add this line:
| Code Block |
|---|
setenv |
...
MAXWELL5_ROOT /opt/local/maxwell- |
...
5 |
It's also possible to write a system specific script that does the copying for you and adds the environment variables to each machine.
| Info |
|---|
The installer also creates another environment variable called |
...
MAXWELL5_MATERIALS_DATABASE that points to the folder where the resources (material files, etc) installed with the package are located. This variable is not needed when running Maxwell in node mode. |
More information about the installation process can be found here:
...
More about licensing Maxwell is described here: Licensing
Network Rendering
The native Maxwell Network System
The Maxwell installation includes a native, easy and powerful Network System, which contains three components: Manager, Monitor and Rendernode. You can send a scene to render directly to network rendering from most of our Maxwell Render plugins.
It allows you to submit, queue and manage the following types of jobs:
Single Job: for individual scenes. Each Rendernode takes one scene in the queue, and renders it independently until it finishes it, then takes the next job.
Animation Job: for animation sequences. A range of frames (MXS scene files) are submitted, and each Rendernode takes an individual frame, renders it independently until it finishes it, then takes the next frame in the sequence.
Cooperative Job: for individual scenes. Cooperative rendering is defined as the process of rendering the same image in several render nodes at the same time, each Rendernode renders the scene with a different seed value, producing MXI renders that are internally different (although they may look similar) that can then be merged into one cleaner file. Due to Maxwells almost linear scaling when rendering on several cores/computers, if you render on 10 computers with the same hardware, your render will finish practically 10x faster.
Connection to 3rd party job managers (Deadline, Rush, Qube, etc)
Maxwell can run as a command line application so its integration in 3rd party render managers is straight forward. Still, there are a few considerations that must be taken into account:
The “-nowait” flag forces Maxwell to exit once the render finishes. If this flag is not set the process will continue to be alive after the render is finished.
Exiting with a return code 0 means success, any other value means there has been an error (0: render successful, 1: critical error).
The “-node” flag forces Maxwell to use a non GUI node license.
The “-norenderifdemo” flag forces Maxwell to stop a render if the node is unlicensed so it does not embed a watermark in the image or restricts the output resolution, but gets stopped before beginning.
In fact, even Cooperative Jobs (many computers working on the same frame) can be handled on a 3rd part job manager. To do this, we include a command line tool called Mximerge with the Maxwell package, created to merge the individual MXI files that each Rendernode produces during a network render, into one "final" MXI. Simply launch the same scene to be rendered on different Rendernodes (Maxwell will take care to assign a different seed to each render), gather all the MXI files they produced and call the Mximerge tool that will merge them together into a single and cleaner image. Type “mximerge –help” for more information about how to use this tool.
The full list of running flags and parameters can be found here: Command Line
Launching a Rendernode using command line
To launch Maxwell in command line mode using a node license instead of a full GUI, all that is needed is adding the –node flag to the arguments list.
A note on installing Rendernodes on Linux (X11 and Xvfb)
Due to 3rd part dependencies, Maxwell needs an X11 session running even in nongui mode. However there is a workaround that can be used to run Maxwell on machines with no display hardware and no physical input devices, using Xvfb (virtual framebuffer). More info on how to use Xvfb can be found here: Network FAQ
Special features
Resuming a render
...
Specifically Color MultiLight needs even more memory than intensity MultiLight and should be used only when there is a real need of changing light colors after the render.
| Tip |
|---|
One important tip is to merge lights that you want to be controlled together, by applying the same emitter material to all geometry that you want to control using a single ML slider. This way you can still benefit from ML, but keep the memory usage to a minimum. |
If resume rendering is not needed then the user might want to avoid the generation of big MXI files (with the -nomxi flag) and just enable the -extractlights flag to automatically save each light in a different image file. You can save these files in a high dynamic range format such as EXR. Also when lights are saved in separate files as HDR images and imported in a composition software such as Nuke, there is no need to enable Color MultiLight because the color of each light can be edited in composition separately.
...
| Code Block |
|---|
Windows > maxwell.exe -mxs:K:\scenes\test.mxs -o:K:\output\test.exr -multilight:on -nomxi -extractlights |
| Code Block |
|---|
OSX

> Maxwell.app/Contents/MacOS/Maxwell -mxs:~/scenes/test.mxs -o:~/scenes/output/test.exr -multilight:on -nomxi -extractlights |
| Code Block |
|---|
Linux

> maxwell -mxs:~/scenes/test.mxs -o:~/scenes/output/test.exr -multilight:on -nomxi -extractlights |
File Management
As mentioned previously, MXI files can be very large depending on the resolution and whether MultiLight is enabled or not. In this case saving to disk can be time consuming. There are several options however to optimize this:
...
This flag can be used to avoid also saving a standard image file format, which is useful if you want to save only MXI files which you can load directly in Nuke, After Effects or Photoshop with our MXI pluginsplugin. If MultiLight was turned on in Render Options, each light channel can be extracted from the MXI into a separate layer using these plugins, along with any other render channels (alpha, motion vector, z-depth etc.), so this can be an efficient workflow instead of having several files per frame which need importing.
...
Memory usage and trouble shooting
The main sources of memory consumption are:
Image buffers. Memory consumed is proportional to the output resolution, and if MultiLight is enabled it also grows linearly with the number of lights. As mentioned previously, the Color MultiLight option should be used only when strictly necessary.
Textures (number and size)
Geometry (incl. Hair / Grass)
When running out of memory the sources of memory consumption can be found following this process:
Disable MultiLight if it was enabled and render at very low resolution (i.e 50x50 px). The difference between the memory consumed now and the memory consumed in the original render is the memory used to allocate image buffers.
Render using a very simple override material. Doing this means no textures are used and it can be deduced how much texture memory was used originally.
Pretty much all the memory not used in image buffers or textures is used for allocating memory structures.
Plug-ins
Every purchase of Maxwell Render includes for free all our plugins for Photoshop, so you can easily work across multiple 3D and compositing applications (incl. After Effects, Nuke, Photoshop). There is a separate section for each plugin in the documentation in your image - see the Plugins section for the full listmore information.