With complex scenes, meshes will allocate a huge amount of disk space. Together with particle BIN files, even large disks can quickly reach their limits. Today mass storage is one of the cheap components of a computer system - however, the sheer amount of data can often lead to problems. Also, some 3D packages simply cannot handle very large meshes.
...
Courtesy of Taek Won Young
These are the parameters to control the rendering of the particle cloud. Many settings are identical with their counterparts inside RealFlow, but there are also some unique values, and the individual parameters are differently grouped. It is applied as an extension object (i.e. in Studio, you can load it on Object>Create Extension Object>MaxwellMesher. In the supported plugins, its location depends on each 3D platforms interface).
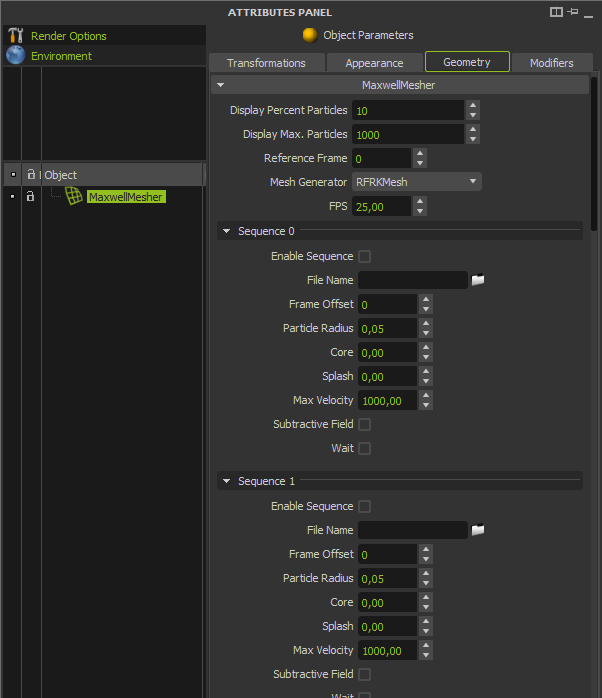
MaxwellMesher panel (detail)
...
| Tip |
|---|
How to find the perfect RadiusFluid particles can be described as tiny droplets or spheres; this value determines the radius of these spheres. When the individual spheres are very close, they'll start blending into each other. This is not just a simple intersection - the amount of blending is calculated by the mesh engine and depends on the distance between the particles and, of course, the adjusted radius. The result is a smooth and organic hull around the particle cloud – at least when all parameters are adjusted correctly. The main problem, especially for beginners, is to find a good balance between Polygon Size, Radius and the emitter's resolution. A good idea is to start with similar values for Polygon Size and Radius and adjust Radius gradually until you've found the optimal settings. Another method is to use the given default values and decrease/increase them according to your requirements. No matter which workflow you use, once you're satisfied with your mesh you can start to filter the fluid's borders. Creating meshes requires a little experience and maybe you'll find a completely different workflow. For beginners the presented method is a very good start to get quality results without spending too much time on trial and error. Finding the perfect radius mainly depends on two factors: testing and experience. A very small radius will show much more detail (if there are enough polygons, e.g. small Polygon Size value), because the individual spheres won't be so blended. The result is often a very turbulent surface where you can see almost every drop. Smoothing and filtering can reduce these effects. Higher Radius settings will decrease the level of detail, because the spheres become bigger and start interpenetrating each other. Another side effect with higher Radius values is that the fluid borders become thicker and show an – often unwanted – rounded look. The “Relax” filter is able to reduce this effect, but you do have to be careful, because strong filtering can produce an artificial look like liquid metal with high surface tension. Of course, the best radius is a good balance between blending and detail, but this is, as mentioned before, a matter of experience. You will soon learn which Radius values work best for calm or turbulent fluids. Then you will only have to perform some minor adjustments and add moderate filtering to smooth the fluid's borders. |
Core filter
The Core and Splash filters values are used to separate the fluid into two individual zones based on a particle's number of neighbours. With these two parameters it's possible to easily create a fluid body with surrounding splashes or foamy areas. You simply enter values for the core fluid and the splashes to differentiate between these two states. The advantage is that both core and splashes can be meshed with different parameters. For the coherent core fluid you can create a rather smooth surface, for example, while the splash parts are much more turbulent. Core and Splash are also a very convenient way to edit and process your meshes without recalculating them.
The Core value ranges between 0.0 and 1.0 and can be adjusted independently from Splash. A value of 0.0 means that the entire fluid will be seen as the core fluid and you can't observe any changes in comparison to a “normal” mesh without these filters. 1.0 removes the complete mesh. With increasing values the mesh will start shrinking.
 Splash filter
Splash works the same way as Core, and you can enter any value between 0.0 and 1.0. With 0.0, the whole fluid body will be treated as one big splash. Like Core, the mesh becomes smaller with increasing Splash settings. When both parameters are set to 0.0, the filters have no influence on the mesh and are deactivated.
...
2. Camera, which analyses the mesh based on the polygons' distance to the scene's camera. Areas close to the camera will keep a high level of detail and regions which are far away will be optimized. This mode is adaptive and also works with moving cameras. This guarantees that the currently focused parts of the mesh can always be rendered at high quality.

Quality
Higher settings yield better results, but at the cost of calculation speed. You can enter any value between 0 and 1, though very small settings can strongly influence the quality of the mesh and lead to unwanted results.
...
The illustration below represents a part of a RealWave mesh and shows you how this feature works. The blue dots represent particles, the orange triangles are polygons. Higher Resolution values are used to subdivide the surface, creating a smoother mesh.

Radius
MaxwellMesher uses the RealWave surface's vertices to create particles and the Resolution parameter adds more particles to enhance quality. Again the result is a particle cloud that can be meshed. Radius has exactly the same function as its counterpart described on the Sequence section above. Though both Radius settings share exactly the same background and functionality, the settings for meshes and RealWaves don't have to be identical. They can be treated separately from each other and mainly depend on the number of particles.
...
You can also determine an offset (frame number) for the loaded mesh with this function. Both positive and negative values are accepted.
Blend material
When you load more than one particle sequence into the same MaxwellMesher object (to be meshed together), you can now give each fluid a distinct look, by using just one multi-layered material. These distinct fluid material layers can even be blended in the transition between two fluids.
| Info |
|---|
You can download a sample of this material sample here. |
Two fluid sequences loaded with the same MaxwellMesher and using a blend material
Simply create a multi-layered material, and use each layer to define each individual fluid. Then, on each material, use a horizontal black-to-white ramp texture as the Layer weight.
...
The smoothness of the transition between two fluids is defined by the smoothness of the black-to-white ramp.
Use a black-to-white horizontal ramp to define the transition of two fluids in the blend areas
This layer will be applied to the fluid loaded in Sequence #1 (Channel 1). The ramp controls the transition between this material and the others.
...
This layer will be applied to the fluid loaded in Sequence #2 (Channel 2). The ramp controls the transition between this material and the others.