Windows: Node Locked license installation
This guide is for Node Locked licenses ONLY which includes:
- Maxwell Render Suite Node Locked
- Maxwell Render Learning Edition
- Maxwell Student
- Maxwell for SketchUp
In case you own a Floating or Faculty license instead, please see here.
Step-by-step video guide to installing and activating your Node Locked license:
How to install and activate a Node Locked license on Windows
00:07 - Download
00:44 - Installation (Maxwell)
01:23 - Licensing
02:07 - Licensing a computer which has an Internet connection
02:37 - License Activation
03:38 - Licensing a computer which does not have an Internet connection
Before you Begin
Please see the system requirements on this page.
Step 1 - Running the installer
- Make sure that you right-click on the .EXE file and choose "Run as Administrator".
- The installer will ask if you also wish to license Maxwell Render. Choose Yes if you have never licensed Maxwell Render on this computer, or No if Maxwell Render was already licensed and you simply updated it with a patch or a new V3.x version. If you choose Yes, see Step 2.
If you are installing a V3.x update, you do not need to re-license Maxwell. It is only if you are upgrading from V1.x or V2.x to V3.x that you need to re-license Maxwell because the licensing systems have changed.
Step 2 - Licensing Maxwell Render
The License Activator application will open and the following licensing options will appear:
I have a license key
Choose this option if you have a Node Locked license key. In the next window there are two options:
- I want to activate the license on this computer now (needs internet connection). Use this option to activate the license on this particular computer.
- Enter your email/password you use for the customer gateway, then the license key which you should have received by email. If you can't find that email please check your spam folder. If you still can't find it please contact us through the "Contact Sales" form in the customer gateway or here and request your license key. If you are connecting your computer through a proxy, you may also enter that proxy here. It is important that any firewalls you may have do not block the license activator from reaching our servers, or the license key can't be validated.
- The license activator will connect to our servers and validate your license, after which it will store a license file in C:\ProgramData\Next Limit\Maxwell\licenses. Maxwell Render, Maxwell Studio, and all the plugins will check this location for that .lic file to see if Maxwell Render is licensed or not.
- Please restart Maxwell to make sure that it is properly licensed (check the Console panel for any red error messages).
- Enjoy Maxwell Render!
- I want to activate the license on another computer not connected to the internet. Please note that the computer where the activator is running still needs internet connection. This option simply allows you to license a different computer which doesn't have internet connection.
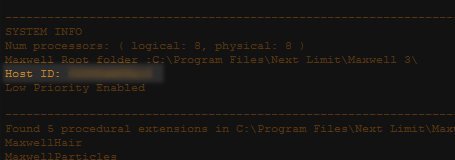
- Host ID. You must specify that computer's Host ID, also known as MAC address. To find it, launch Maxwell Render on that computer, and check in the Console panel for the Host ID:
- Enter your email/password you use for the customer gateway, then the license key which you should have received by email. If you can't find that email please check your spam folder. If you still can't find it please contact us through the "Contact Sales" form in the customer gateway or here and request your license key. If you are connecting your computer through a proxy, you may also enter that proxy here. It is important that any firewalls you may have do not block the license activator from reaching our servers, or the license key can't be validated.
- The license activator will connect to our servers and validate your license, after which a Save dialog pop up will ask you to save the "maxwell_license.lic" file. Save this file somewhere on your computer, then move it to the computer you entered the Host ID for, and place it in the folder: C:\ProgramData\Next Limit\Maxwell\licenses on that computer. Maxwell Render, Maxwell Studio, and all the plugins will check this location for that .lic file to see if Maxwell Render is licensed or not.
- Please restart Maxwell to make sure that it is properly licensed (check the Console panel for any red error messages).
- Enjoy Maxwell Render!
I want to try the demo
The most common licensing error messages
- Connection error - Usually means the license activator and/or Maxwell Render is blocked by a firewall and can't reach our servers.
- "License could not be validated" - Usually has the same cause as the above.
- "License could not be saved" - This means Maxwell doesn't have enough permissions on your computer to write the license file to disk. Start the install process again, making sure to right-click on the installer and chose "Run as Administrator".
If you still have problems, the first thing you should do is open Maxwell (not Maxwell Studio) and look in the Console panel for any licensing errors. Then go to the licensing troubleshooting page to see if the error message is listed there, and what the solution is.
Installing Maxwell in silent mode
Maxwell allows a silent installation of its components via command line on Windows. To do so, simply type /S when invoking the installer on the command line prompt:
- On Windows 32Bits: maxwell_3.0_win32.exe /S /D=C:\Program Files\Next Limit\Maxwell
- On windows 64Bits: maxwell_3.0_win64.exe /S /D=C:\Program Files\Next Limit\Maxwell
The additional arguments are:
/D=dir (to indicate the folder where Maxwell will be installed)
/MATERIALDATABASE= dir (to indicate the path to the materials database folder)
/SHORTCUTS=on/off (creates desktop shortcuts to the application. By default it is disabled)