The Monitor is an application that lets you add jobs to the queue, assign or remove render nodes, view the status of the different jobs and preview the renders in progress.
To start the Monitor on any of the computers connected to the network, click on the mx_monitor shortcut.
The Monitor icon
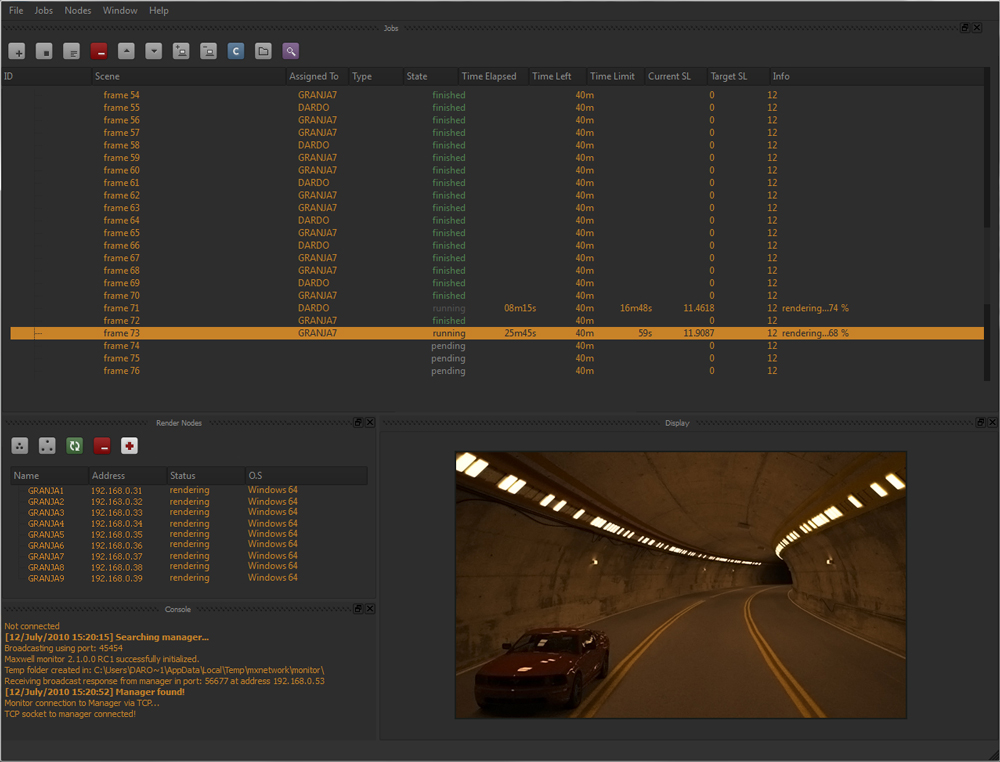
This is the Monitor interface window, from here you can control your network jobs:
The Monitor interface
Menu bar
File
- Preferences: This is a Preferences panel. You can choose which TCP port the Monitor should use for the network rendering and you can also specify the maximum number of nodes that should be used for network rendering. The TCP port setting is useful for networks that block certain ports. You can force any node to work always in Low or Normal priority, or to share a desired number of threads. You can also start the Render Node hidden in tray if you prefer. It also allows you to set the Minimum Log Verbosity, to control the amount of information you want to be displayed on console. The Deep Debug is the mode that displays more information, that can be useful in case of problems.
- Open temp folder: Opens the temporary folder of the Maxwell Render network where all the temporary files of the render jobs are stored.
- Purge temp files: Use this option to delete all the temporary files on this computer. The temporary files are purged automatically when a render job has finished.
- Save Log: Use this option to manually save the log in a location you choose.
- Find: On long logs, this option can be helpful to find certain message or info.
- Clear console: Clear the messages in the Console panel.
- Quit: Quits the Monitor application.
- Help: Help resources and information about the Maxwell Render version in use.
Important: It is strongly recommended that you do not change the Port Range value unless you are an expert network administrator. It is critical that all the machines in the Maxwell Render network are using the same port, otherwise the system will not work properly.
Jobs
From here you can add, stop or remove selected jobs. You can edit a job to change the target Sampling Level during the render.
You can increase or decrease the priority of a certain job, include a new extra node into a certain job, or release a node from a certain job.
You can also preview a selected job while rendering, remove all the finished jobs and open the output folder.
Nodes
From here you can group/ungroup several nodes into one entity to easily assign different tasks to different groups. You can also reset a pending node, or kill a node when you need to free that computer for other tasks, and you can reset all the nodes if you need to.
Window
Choose which panels you want to hide/display in the window.
Help
Help resources and information about the Maxwell Render version in use.
The Jobs panel
View a list of jobs submitted to the render farm and complete information about them: ID of the working node, Scene, Type of Job, Priority, Status, Current Time, End Time, Current SL and Final SL. All the options can be also accessible through the right mouse button menu.
Icons in the Jobs panel
These icons allow you to (from left to right):
- Add a new job to the job queue
- Stop the selected job
- Edit the target Sampling Level or Time of the selected job
- Stop a job and remove it from the job queue
- Increase or Decrease the priority of the selected job
- Add certain nodes to the selected job
- Release the selected nodes from a certain job
- Release finished jobs from the job list
- Open the output folder of a job
- Preview the selected job
The Nodes panel
View the Render Nodes available in the network.
Icons in the Nodes panel
The icons allow you to Group/Ungroup several nodes into one entity to easily assign different tasks to different groups. You can also Reset the selected nodes or Reset the entire network. This will stop its current work and purge all its pending tasks. This can be useful to restore a node after a problem without needing to restart the whole network. You can also Close the mxnetwork application in the selected nodes, to free those computers for other tasks
The Console panel
Displays information and messages about the rendering process. If there are any issues with a render job it will also be displayed in this panel.
The Display panel
One of the most powerful functions of the Maxwell Render network system is the Display function. While the Nodes are rendering, you can select any of them and press the Preview button to automatically display the image being rendered on that node.
The Preview button also supports instantaneous viewing of a cooperative job as merged during the render progress. To do this, select the job tree (instead of just one server) and click Preview. This way you can preview the final result of the Nodes that are working together on that frame (an instantaneous merging process is executed to perform this interactive Preview).
You can even order a preview of an animation job, by selecting the animation job and hitting the “Preview” button.
This will create a display for all the rendered frames of the animation, and will allow you to play the animation using the Shift + right arrow key (play forward) or Shift + left arrow key (play backward).
Displaying a preview during the render

