This panel allows you – among other things – to adjust the exposure of your image during rendering and after the render has finished.
Camera: Choose which camera in the MXS should be used for rendering.
Resolution: Specify the size (in pixels) of the image to be rendered. When the lock icon is enabled, the horizontal and vertical resolution values maintain the same aspect ratio.
Selection: Specify if you want to render the Full frame at the desired resolution, render a particular Region (defined by the Origin and End numeric fields), or Blow Up a region (defined by the Origin and End numeric fields) at the desired resolution. You can also draw the desired region using the marquee icon.
Interactive parameters
These parameters will immediately update either your main render window (if you have Fast Multilight Preview turned on in Maxwells preferences), or the small preview render in the preview panel (and when a new SL is reached, will also update the main render window).
ISO: Sensitivity of the film to light. The higher the ISO number, the more sensitive the film will be to light, resulting in a brighter image. Please note that this parameter does not add grain-noise to your image as is the case in the real world with higher ISO films.
1/Shutter (s): The shutter speed, specified in 1/n of a second. Specifies the time light has to reach the film. The higher the specified number, the less time the light has to reach the film, resulting in a darker image.
Response: Choose between different color "response" curves of different digital sensors or films. These have a characteristic response curve, or sensibility to different colors which give them a distinct look. Besides Maxwells linear sensibility curve, you can choose from a selection of common sensors and older film types. This setting uses the full spectral information from the render, it can be interactively tweaked during or after rendering without damaging the original data.
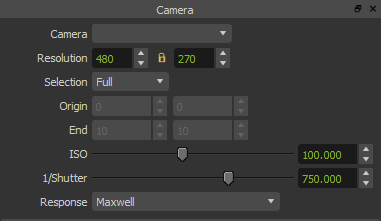
The Camera adjustment panel
EXIF data
This section of the Camera panel displays EXIF data that is also embedded in the rendered image. This data includes camera focal length, shutter speed, diaphragm aperture, ISO sensibility, exposure value, diaphragm shape, sensor size and pixel aspect ratio.
The EXIF data embedded in the image can be used by image viewers to sort and filter images based on the different data in the EXIF.
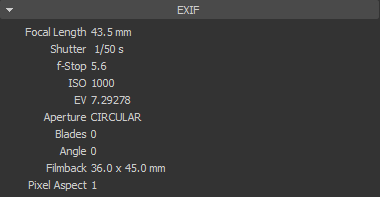
The EXIF data section of the Camera panel
Tone Mapping
Tone mapping, in the case of Maxwell Render, refers to converting the spectral space render calculations into pixel values (color and brightness) so that the rendered image can be displayed on the screen. Here you have options available to control this conversion, including changing the color space and antialiasing sharpness.
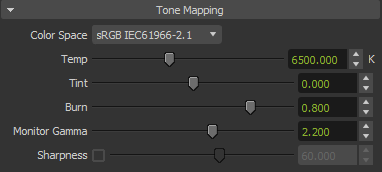
The Tone Mapping adjustment panel
Color Space
Choose your desired color space for the rendered image. Available color spaces are sRGB, Adobe 98, Apple, APL, NTSC (1953 and 1979), Wide Gamut RGB, Prophoto RGB, ECI RGB, CIE 1931, Bruce RGB, ColorMatch RGB, Best RGB, Don RGB and HDTV.
White Point / Tint
Together they form the white balance tool in Maxwell. Please see the Camera white balance page for details.
Burn
Parameter to control the highlights in a render. Lower burn values will decrease the intensity of the highlights to avoid “burned out” areas in the image. In most cases this parameter should be left at default. Lowering it too much may produce unnatural-looking images.
Monitor Gamma
Maxwell Render™ internally uses a gamma of 2.2 to convert from spectral space to RGB space. You can use this parameter to control the gamma conversion. Lower gamma values darken the image, higher values lighten the image. Note that you can control this parameter interactively while rendering in core rendering application.
Sharpness
Parameter that allows you control the antialiasing filtering, producing a softer or sharper AA effect. It can be useful to minimize the moire effect seen in images that have fine repetitive lines, by lowering the sharpness, as too much sharpness can cause a flickering effect in animations in these cases. This feature is non-destructive and can be edited at any time, even after the render has finished, by simply loading an MXI file of the render and changing the Sharpness parameter. The default setting of 60 is good for most cases.
Histogram
The histogram provides a graphical representation of the tones in the image, providing valuable interactive information about the brightness of your render while you edit it.
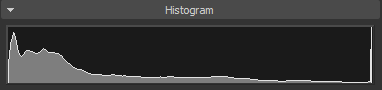
Render histogram
Overlay Text
Overlays a text ribbon with custom information over the render, that is included in both the MXI and the image file. The text information is updated at each Sampling Level update.
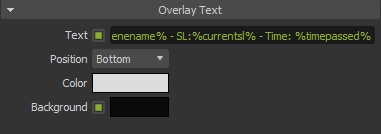
Overlay text panel
Text
Set the text you want to overlay on the render. This field allows custom text and macros to recover render information. The currently supported macros are:
Macro shortcut | What it replaces with |
|---|---|
%benchmark% | current benchmark value |
%burn% | current Burn value from Tone mapping options |
%camera% | name of the active camera |
%colorspace% | color space used for the render |
%currentsl% | current SL (therefore this value changes with each SL update) |
%date% | current date in MM.dd.yyyy format. Can also be used: %yy% (year) , %mm% (month) and %dd% (day) |
%finalsl% | SL limit set |
%gamma% | current Gamma value from Tone mapping options |
%iso% | ISO value from Camera options |
%resolution% | resolution of the active camera. Can also be used: %width% and %height% |
%scenename% | the name of the MXS file that's currently rendering |
%scenepath% | full path of the MXS file |
%sharpness% | sharpness value from Tonemapping options |
%shutter% | shutter speed from Camera options |
%temp% | full path of the temp folder of the OS |
%time% | current time in HH.mm format. Can also be used: %hh% (hour) , %min% (minute) and %sec% (sec) |
%timepassed% | time passed since render started |
%version% | current engine version |
Position
Sets the position of the text, at the top or bottom of the image.
Color
Sets the color of the text font.
Background
Sets the color of the background ribbon.