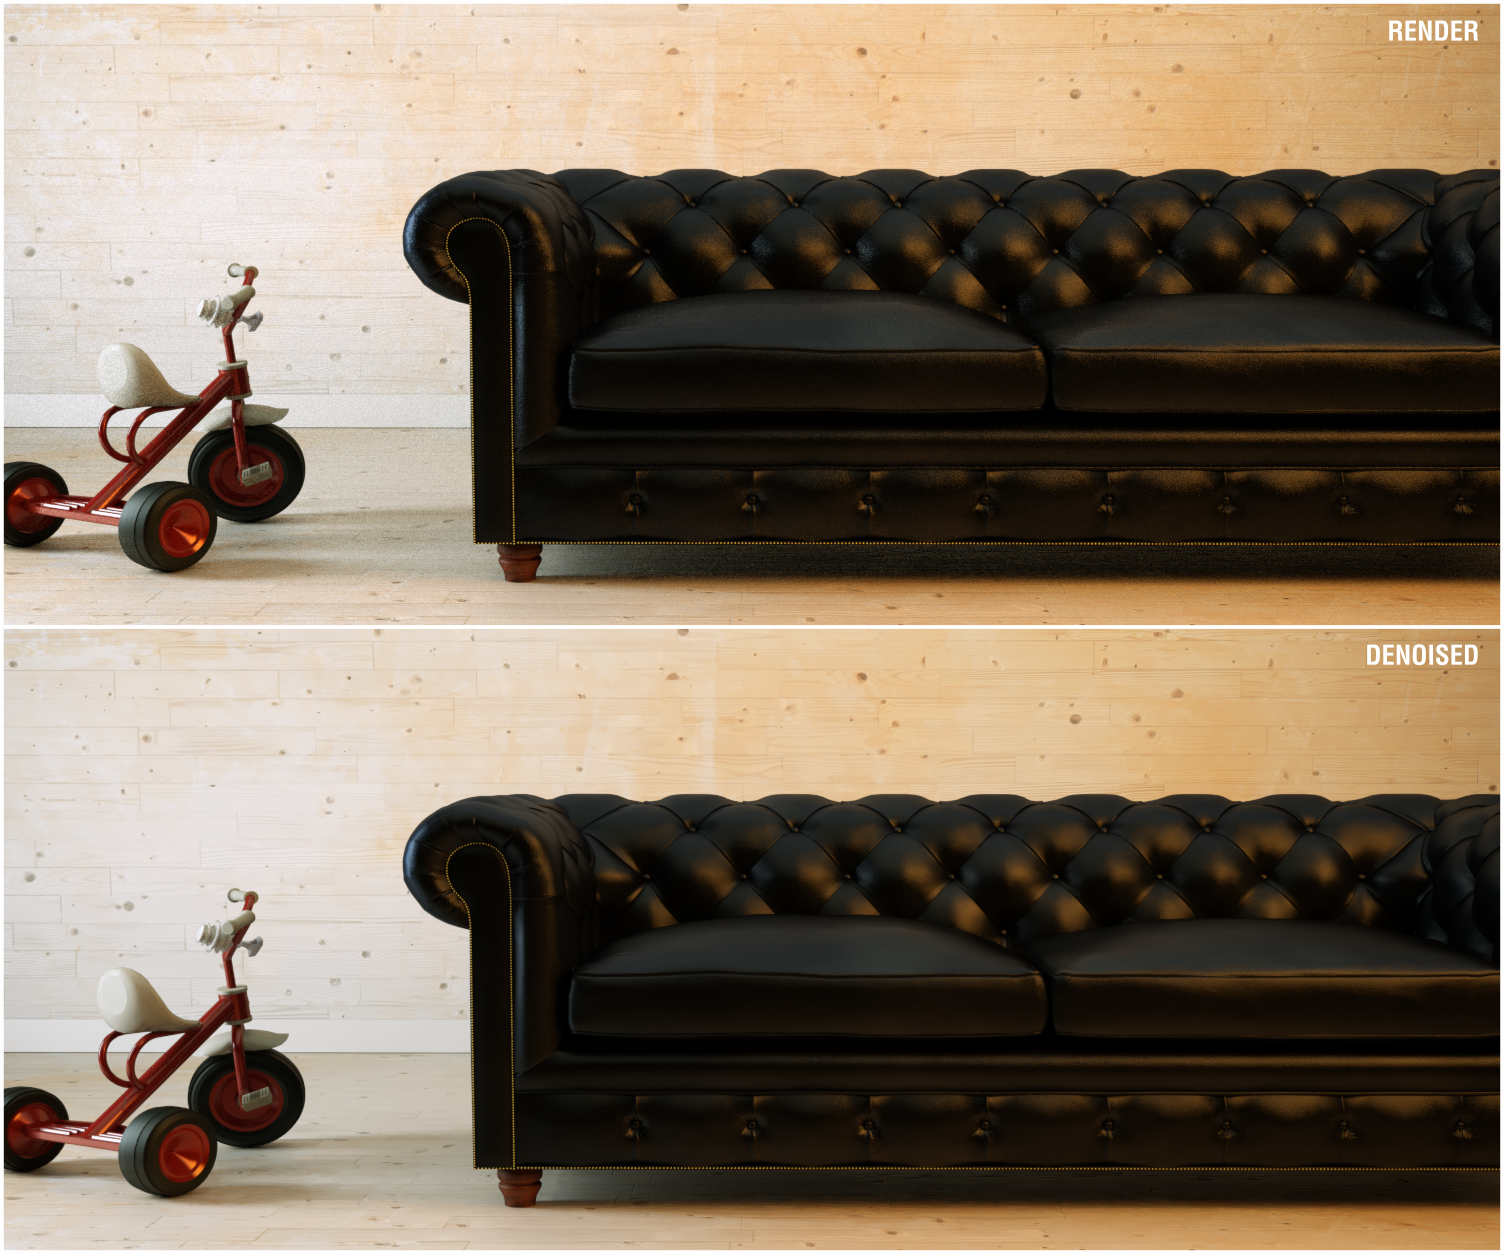
Denoiser comparison (click to enlarge)
Maxwell includes an integrated denoiser solution to help to remove the noise (or render grain) so you can get final images quicker.
The denoiser calculation is a biased process applied over unbiased Maxwell renders. The higher the sampling level of the render, the more accurate the denoiser solution will be and the less bias it will introduce.
Using it is very easy. You only have to activate it and the denoised image will be calculated during the render or at the end. You will see it as any other channel along with the main, not-denoised render.
User Interface
You can launch a render with Denoiser either from Maxwell Studio, Maxwell Render or any plugin. You will find very similar options on all the platforms and products.
In Studio you can find Denoiser options under Render Options > Scene tab > Denoiser section.
In Maxwell, it is in Render Options panel > Denoiser, right below the Scene section.
In plugins, its location may change from one to the other but it should be close to the main render options.
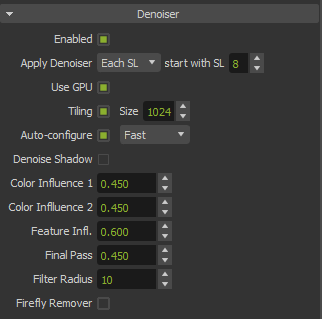
Denoiser options section
Regardless of where you use the denoiser, you will find the same options:
Enabled | Activates or deactivates denoiser calculation for the next render. |
Denoised Image | Here you can specify the path, name and format of the denoised image. |
Apply Denoise | In this drop-down menu you can choose to calculate the denoised image at each SL starting with the one set in the spinbox (default option) or only at the end of the render. |
Denoise Shadow | This option allows to additionally denoise shadow channel (only available with "Auto configure" set to "Accurate") |
Use GPU | If on, the denoised image will be calculated using the GPU (much faster usually), if not it will use CPU |
Auto Configure | If activated, this option will set all the required channels and options automatically; it comes in two flavours: Fast and Accurate (explained below). |
Re-Denoise (only in Maxwell Render) | This option allows to redo denoise calculation after you have made changes to Multilight sliders, so you can produce a denoised image with the new light configuration. |
Workflow
Two renders.
It's important to understand that the Denoiser needs to launch two renders and benefits from some extra channels so, when you activate the denoiser, render routine changes in order to get this information.
Don't worry, everything is done under the hood automatically and at the end, you will get the work of both renders combined in a merged mxi plus the denoised image.
You can get information the progress of both renders in Render Progress and Render Info toolbars and in Console:

Toolbar with two passes information
Apply Denoise - Each SL or At end.
There are two options to show denoised image:
Each SL
In this mode, Maxwell will calculate first pass (first render) until it gets to the SL set in the spinbox ("starting with SL") and then the second pass (second render) will kick in;
when both passes have reached SL4 (default setting) the first denoised image is calculated and shown in render viewport as if it was an extra channel (but with a square icon instead of a circle);
after that, the first pass is resumed until it reaches the next SL and then the second pass is also resumed; when both passes reach the same SL another denoised image is calculated and the process continues with this loop until it reaches the final SL or the process is stopped.
When the render is finished you will get the denoised image and both not-denoised passes will be merged into one file mxi and the image saved in the specified output format, so you get the result of all the work done.
All intermediate denoised images are calculated with a faster and lower quality method, but the final denoised image is always top quality.
This method allows to monitor if the render needs more time or not while you see the denoised result. It's the most interactive method.

Render routine scheme at "Each SL" mode.
A sequence of a render at different SLs compared with its denoised version at the same SL when denoising at each SL.
At end
In this mode, Maxwell will only calculate the denoised image at the end of the render.
It’s the most efficient method in terms of rendering speed, but it’s less interactive.
The Denoiser channel will remain black until the end of the render.

Render routine scheme at "At end" mode.
GPU or CPU
Regardless of the render engine you use, the Denoiser is capable of calculating the denoised image using GPU or the CPU. You can use Nvidia, AMD and Intel graphics cards; it works with CUDA (Nvidia) and this is the fastest, but it can also work using OpenCL either in GPU (Nvidia, AMD or Intel) or CPU.
The default option is GPU as it is usually much faster; the Denoiser will first try to use CUDA, if it doesn't find a compatible card, it will automatically fallback to OpenCL GPU (usually with AMD and Intel cards) and then OpenCL with CPU.
These would be the minimum system requirements for Denoiser:
When using Nvidia CUDA, the drivers should support at least CUDA 7.0
When using AMD, the Catalyst driver should be up to date.
In the case you get an error message when using CPU about OpenCL ICDs, it means Maxwell cannot find valid OpenCL drivers installed on your machine; usually, those drivers are included with your graphics card drivers, so I would try updating the drivers to the latest. If that doesn't help, it will probably be solved by installing this Intel's OpenCL runtime package:
Windows: opencl_runtime_18.1_x64_setup.msi
Linux: opencl_runtime_18.1.0.013.tgz
This could also solve the error "OpenCL exception" shown when using the latest AMD processors.
Tiling
This super-useful feature makes Maxwell calculate the denoised image by tiles or pieces, instead of trying to calculate the whole image in one go. This greatly reduces the memory requirements when calculating the denoised image.
The Size spinner next to it sets the maximum size of the tiles, so you can control the memory that will be used. This allows you to denoise the render on virtually any device. Please, notice that smaller tiles mean some more calculation time. This can be changed after the render has finished.
Auto configure
The Denoiser can make good use of extra channels in order to preserve the features and details of the image, but it has some special requirements for the channels. Auto configure option sets everything up for you.
Both options, Fast and Accurate, calculate de denoised image with the same quality but activate different options under the hood that may affect render time and the final result in different ways.
Let's see the differences between Fast (default) and Accurate:
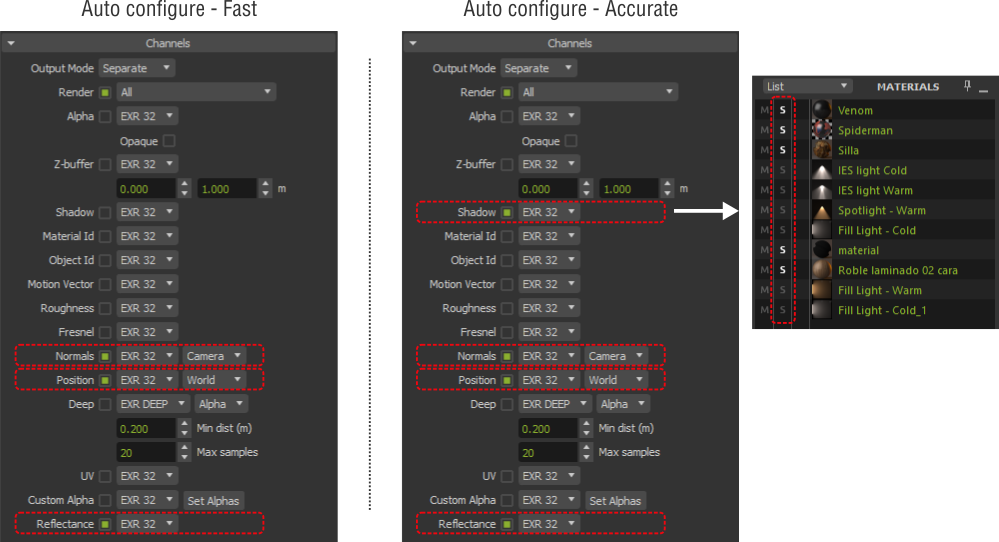
When you activate Auto configure, you won't see these channels actually active in the channel list, but they will be activated internally at render time, stored in the mxi, you will be able to see them in the render area and will be saved along with the render, the denoised image and any other channel that was active.
The main difference between Fast and Accurate is that Fast doesn’t use the shadow channel making it much faster than the Accurate method, but as it relies on fewer channels, the denoiser has less information about the scene and it could blur, for example, objects behind glasses (the shadow channel can give information about the geometry behind the glasses).
On the other hand, the Accurate method marks the Shadow option in all materials except for emitters, so they show in the shadow channel and activates this channel. The render will be slower but will count on shadow channel information which can make the denoiser process preserve more details of the image.
The Fast method is set by default as it doesn’t impact the render speed as much as the accurate method and it works nicely in most situations. Only if the render includes objects inside refractive ones (like a jar of marbles, for example) or if you need to obtain the shadow channel for compositing purposes anyway, using the Accurate method is advisable.
If you don't want to use any of the two Auto configure options and set everything up manually, you have to take into account that the Denoiser needs the following to work correctly:
all channels in EXR 32 format;
if you use Normals channel it should be in Camera mode;
If you use Position channel it should be in World mode;
if you want to use the Shadow channel, it is recommended to turn on Shadow option in all materials except for emitters.
Fine-tunning options
Now Maxwell exposes some parameters to fine-tune the Denoiser result
Particularities
Auto configure will always be set to "Fast" when using GPU render engine.
When using Extra Sampling feature, only "At end" method will be available.